Descriptive Atlas

Minimally Invasive Ivor-Lewis Esophagectomy

Introduction

Initial attempts at minimally invasive esophagectomy (MIE) were hybrid operations combining traditional open surgery with minimally invasive techniques. The first report by Collard in 1993 included 6 patients who underwent thoracoscopic mobilization of the esophagus followed by laparotomy and preparation of the gastric conduit [1]. A completely laparoscopic transhiatal esophagectomy was also described by DePaula in 1995 [2], who described 12 patients requiring esophagectomy, predominantly for benign disease (end-stage achalasia secondary to Chagas disease). The first experience with MIE in North America was not reported until 1997, when Swanstrom described a group of 9 patients with small tumors, benign strictures, and Barrett’s disease [3]. Eight of these patients had a totally laparoscopic trans-hiatal esophagectomy, while one required the addition of a right video-assisted thoracoscopic surgery (VATS) procedure.

Since the first report, there has been a steady but slow rise in the number of institutions around the world performing this complex operation. There are several reasons for the rather slow pace of acceptance of this operation as the standard of care for esophageal resection. First, the adequacy of minimally invasive esophagectomy as an oncologically-sound operation has been challenged. Secondly, cost and utility of operating room time has been an issue. Finally, the low allocation of cases per surgeon impairs the surgeon’s ability to develop and refine the surgical technique and thus establish a “comfort level”.

We believe that the technically demanding nature and inherent complexity of this operation have been the main impediments to most thoracic surgeons accepting this operation. There are no large- scale randomized data to show superiority of outcome, but there are now several studies showing comparability of minimally invasive esophagectomy outcome with the open approach.

Francesco Palazzo et al (2015) undertook a study comparing minimally invasive esophagectomy (MIE) with open or hybrid esophagectomy (OHE) for patients with cancers of the esophagus and gastroesophageal junction [4]. The series contained 104 patients who underwent MIE and 68 patients who underwent open 3-hole, Ivor Lewis, or hybrid technique esophagectomy. Palazzo concluded that their results support MIE for esophageal cancer as a superior procedure with respect to five-year survival (MIE 64%, OHE 35%, p < 0.001), perioperative mortality (MIE 3.9% vs. OHE 8.8%, p = 0.19), and severity of postoperative complications.

Another study was undertaken by Fanyu Meng et al (2014) comparing the outcomes of open and minimally invasive esophagectomy in 183 patients with esophageal cancer [5]. In the study, 89 patients underwent open esophagectomy (OE) and 94 underwent thoracoscopic and laparoscopic esophagectomy (TLE). Their results showed the TLE method having significant advantages over OE with respect to blood loss (182.6±78.3 vs. 261.4±87.2 mL, P < 0.0001), hospital stay (13.9±7.5 vs. 17.1±10.2 days, P=0.017), surgical morbidity (25.5% vs. 46.1%, P=0.004), and rate of pulmonary and cardiac complication (9.6% vs. 27.0%, P=0.002; 4.1% vs. 12.4%, P=0.046). However, the paper reports no difference in survival period between the groups.

In a prospective comparison, Noble et al (2013) discuss the results of totally minimally invasive versus open Ivor Lewis esophagectomy [6]. The study had 106 patients who underwent esophagectomy, 53 of which were totally minimally invasive thoracolaparoscopic 2 stage esophagectomy (MIE-2). The study reported no significant difference in outcomes between the two approaches, aside from significantly less blood loss in MIE-2 cases (median 300 [range 0– 1250] ml vs. 400 [range 0–3000] ml, p = 0.021).

Urs Zingg et al (2009) also compared minimally invasive with open esophagectomy for patients with esophageal cancer [7]. The study reported outcomes in 56 (36%) attempted MIE cases and 98 (64%) open esophagectomy cases. Of the 56 attempted MIE procedures, 30 patients (53.6%) underwent a combined laparoscopic and thoracoscopic procedure and 26 (46.4%) underwent a thoracoscopically assisted esophagectomy. The results showed no significant differences between the groups and concluded that MIE and OE have comparable morbidity, mortality, and overall survival.

In a systematic review of the literature, Verhage et al (2009) compare minimally invasive to open procedures in esophagectomy for cancer [8]. The study selected 10 articles between 2000 and 2009 that compare open esophagectomy to some form of MIE, all of which were case-controlled studies with varying levels of evidence. Overall, the study compares 494 patients that underwent open transhiatal or transthoracic surgery, versus 616 patients receiving some form of MIE. The study concludes that the collective results point towards improved short term outcomes after MIE. Blood loss and hospital length of stay were significantly reduced in MIE cases. The study also found that morbidity and mortality rates were lower in minimally invasive approaches, with total complications being lower in most and comparable in some.

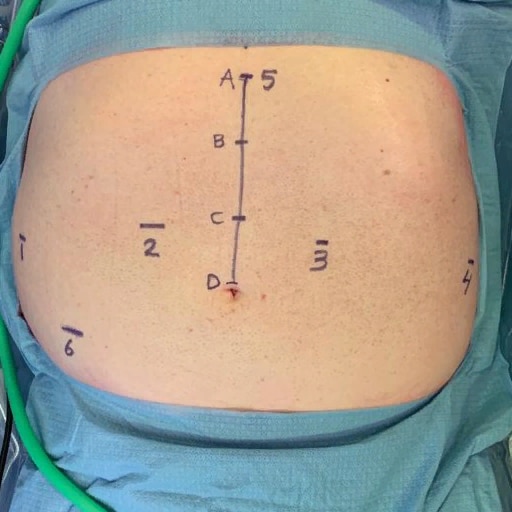
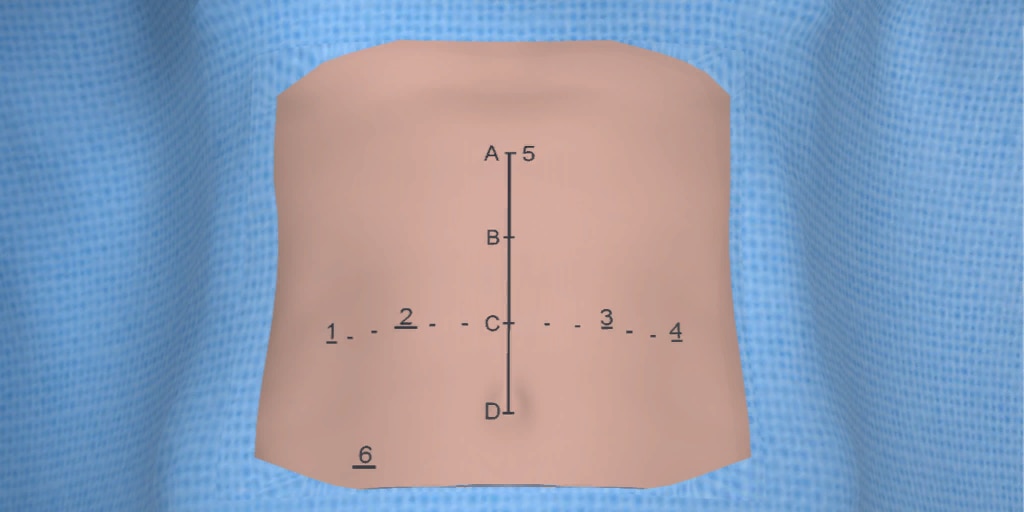
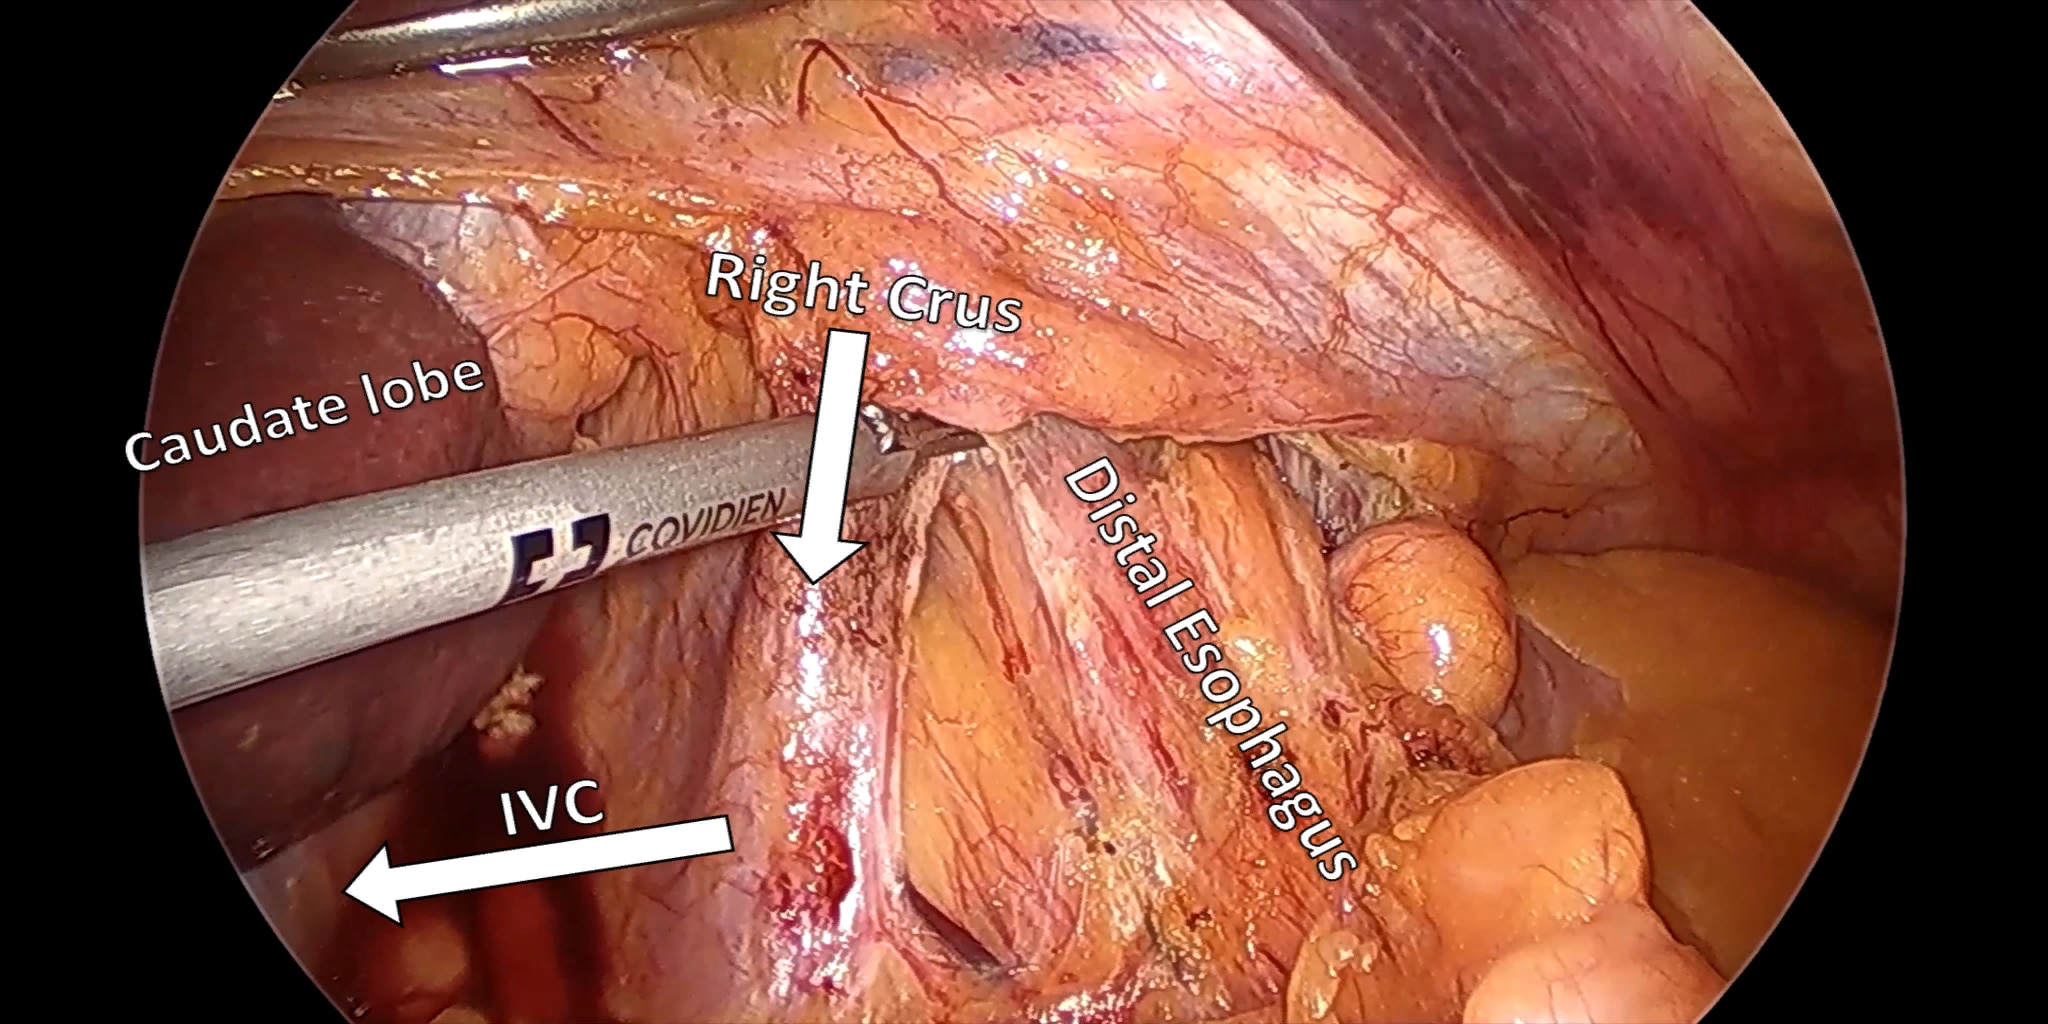
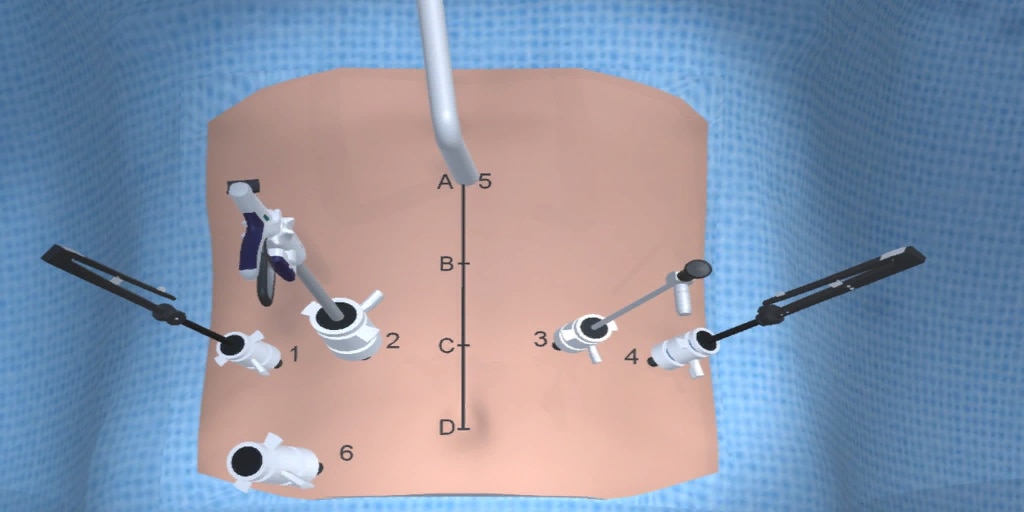
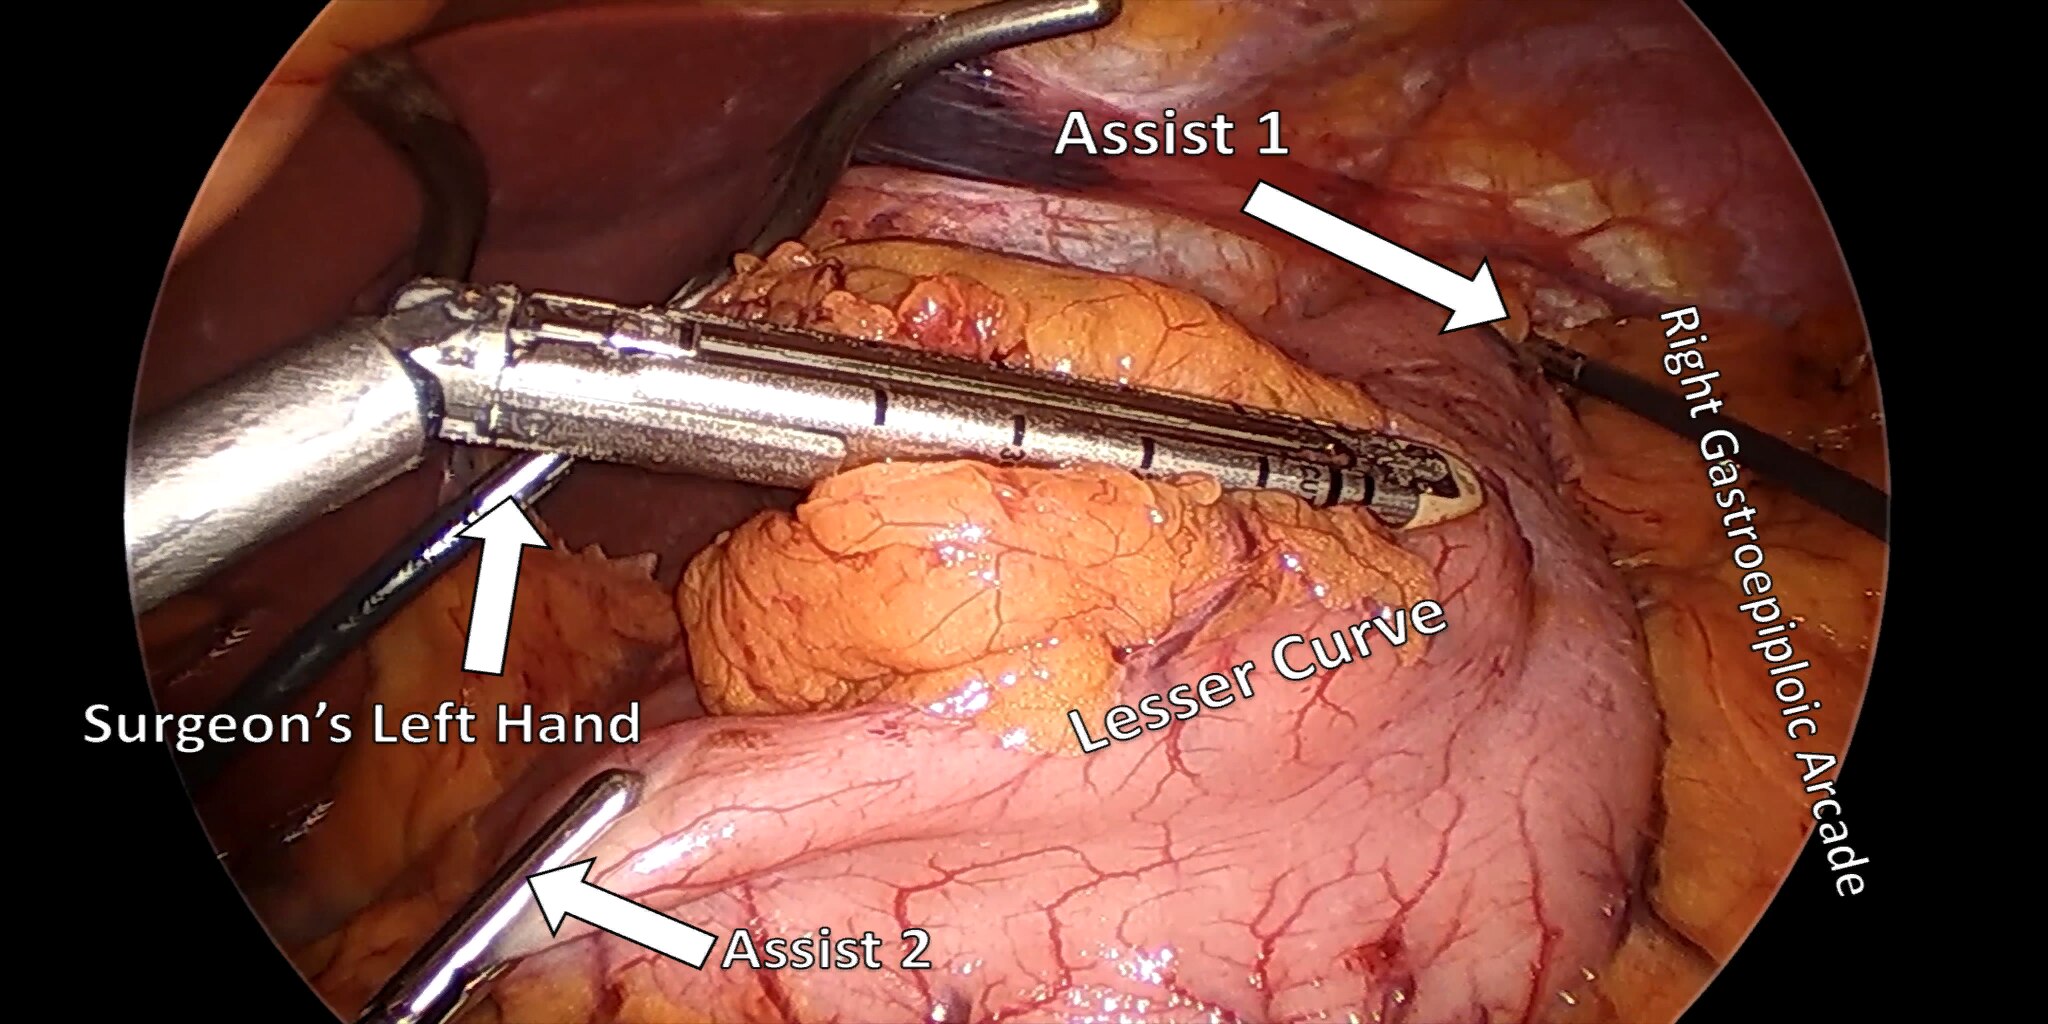
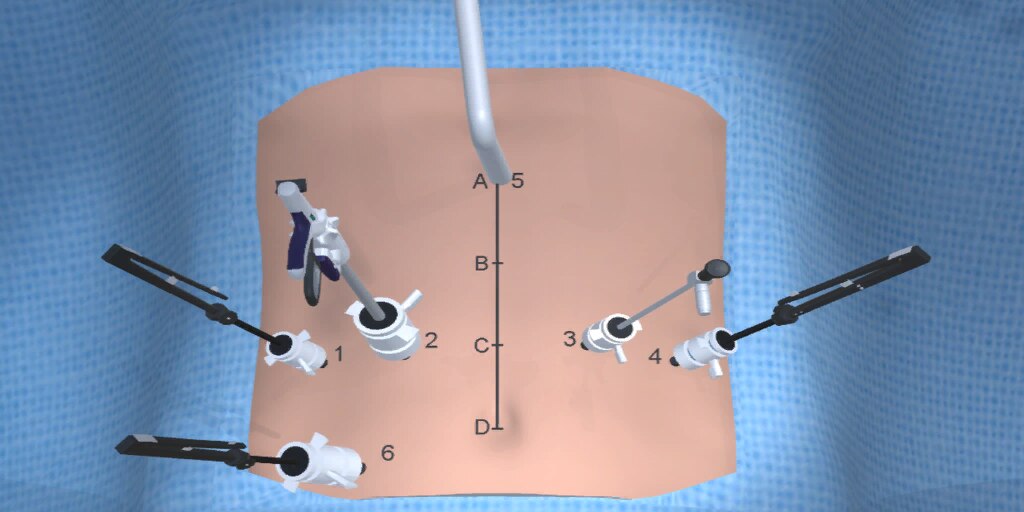
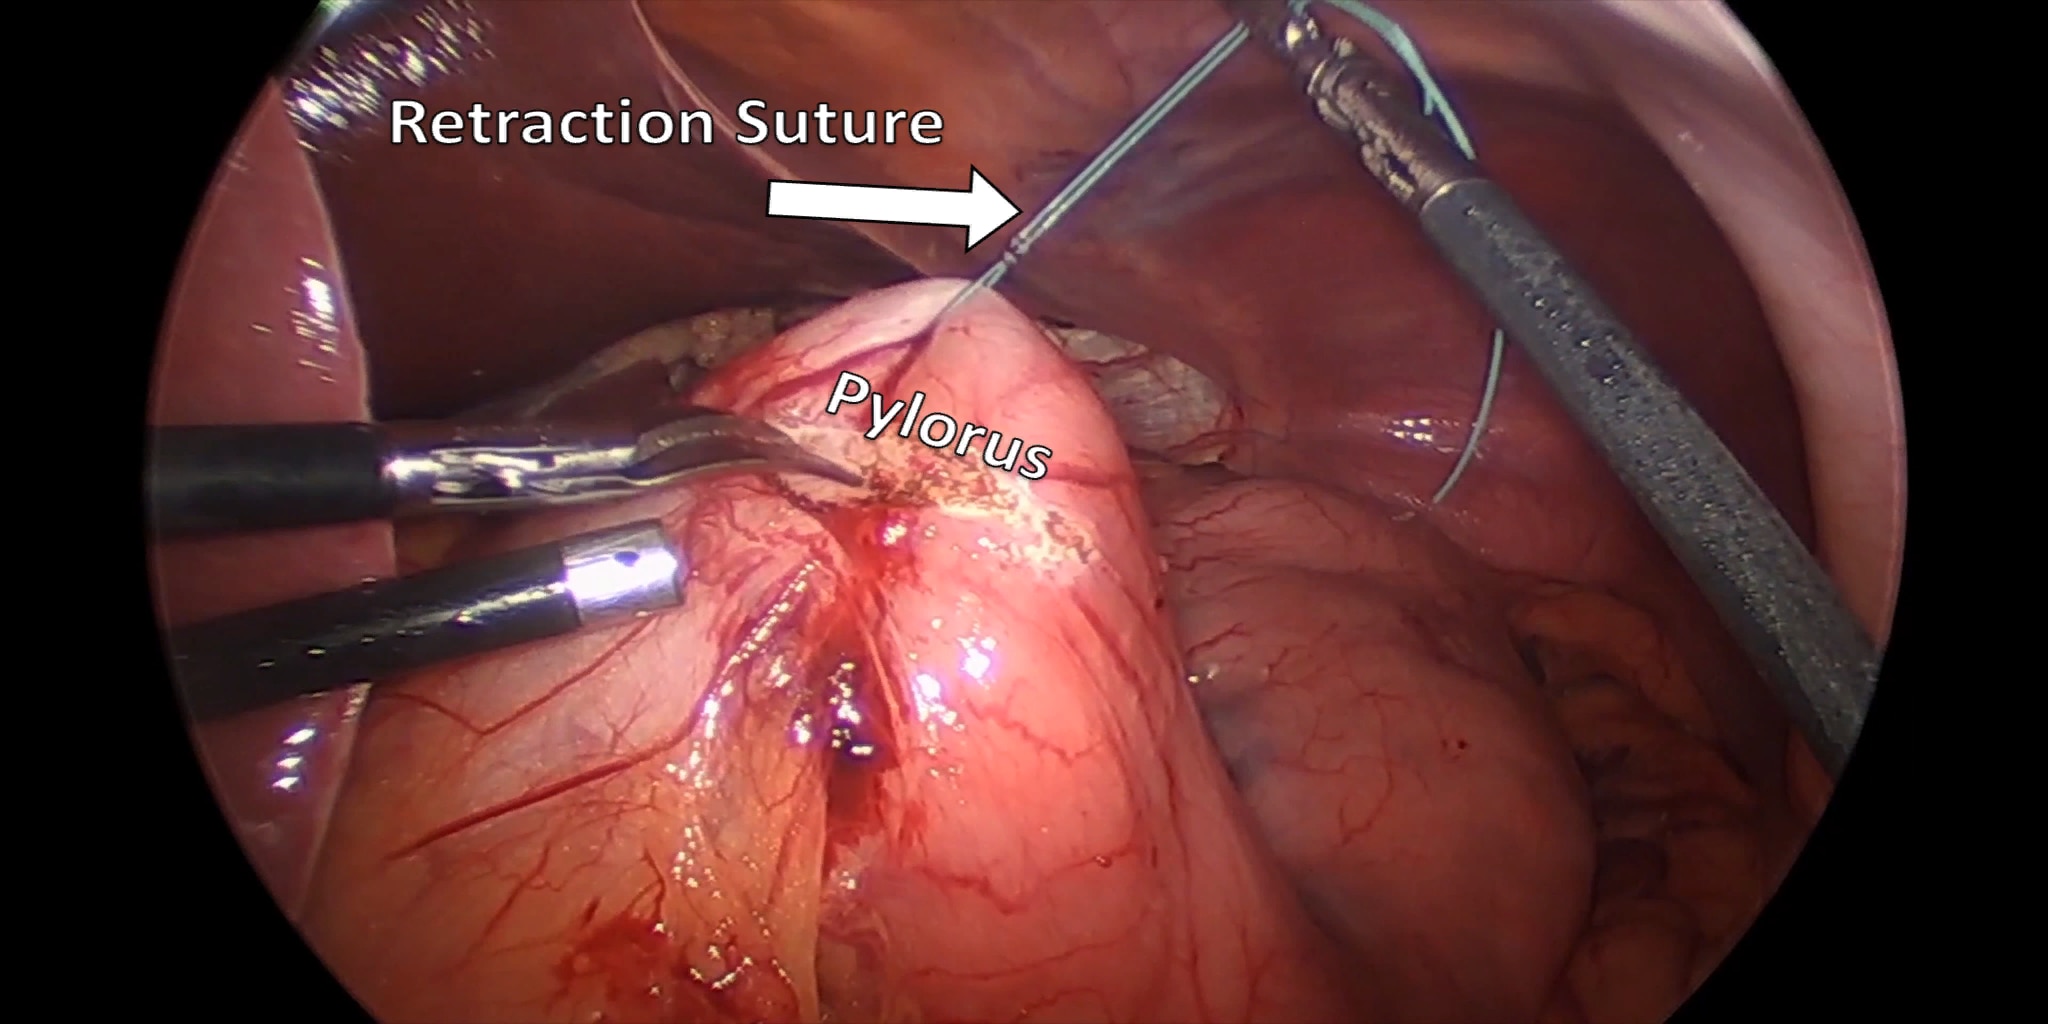
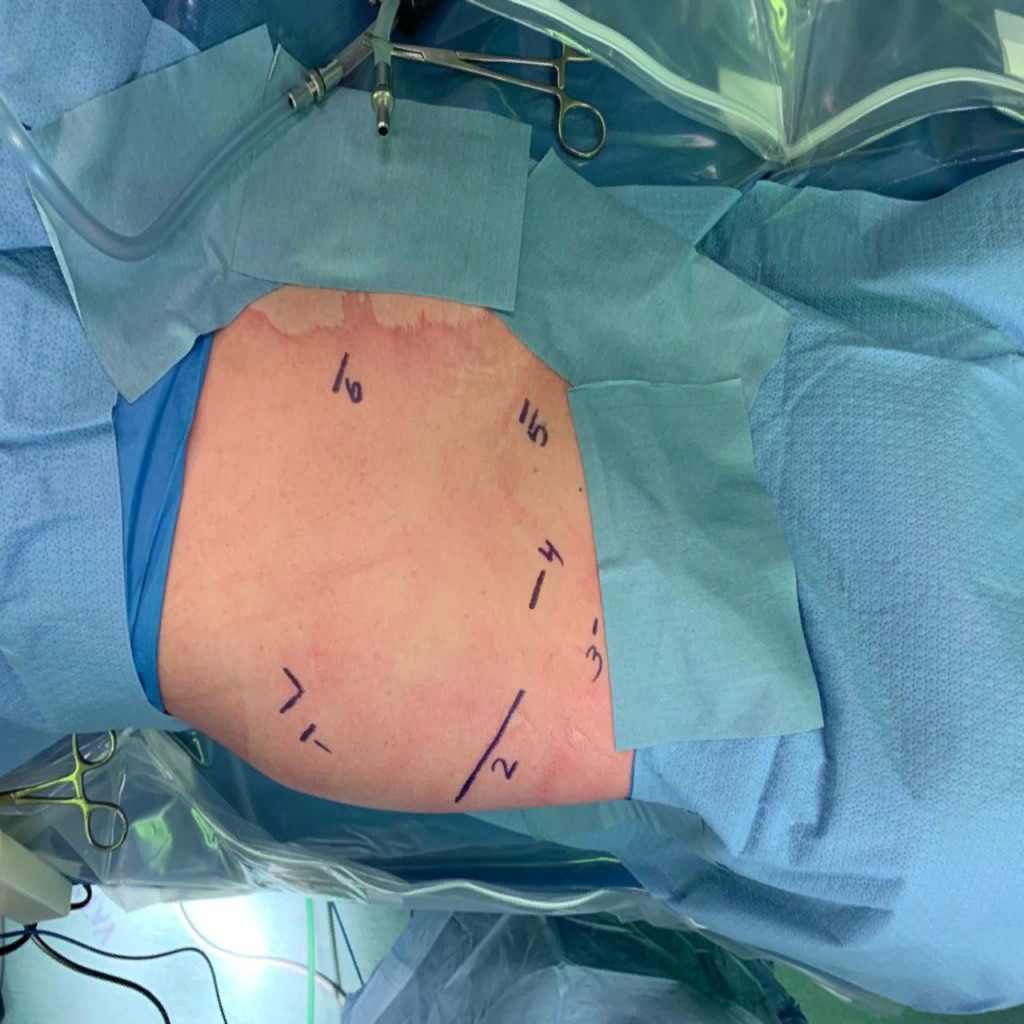
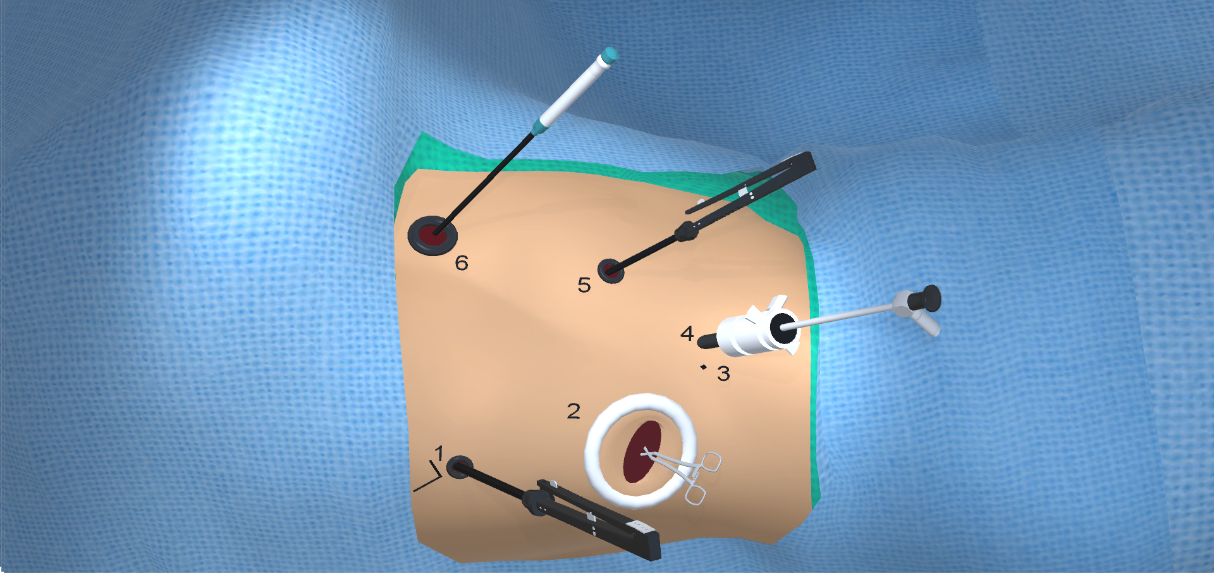
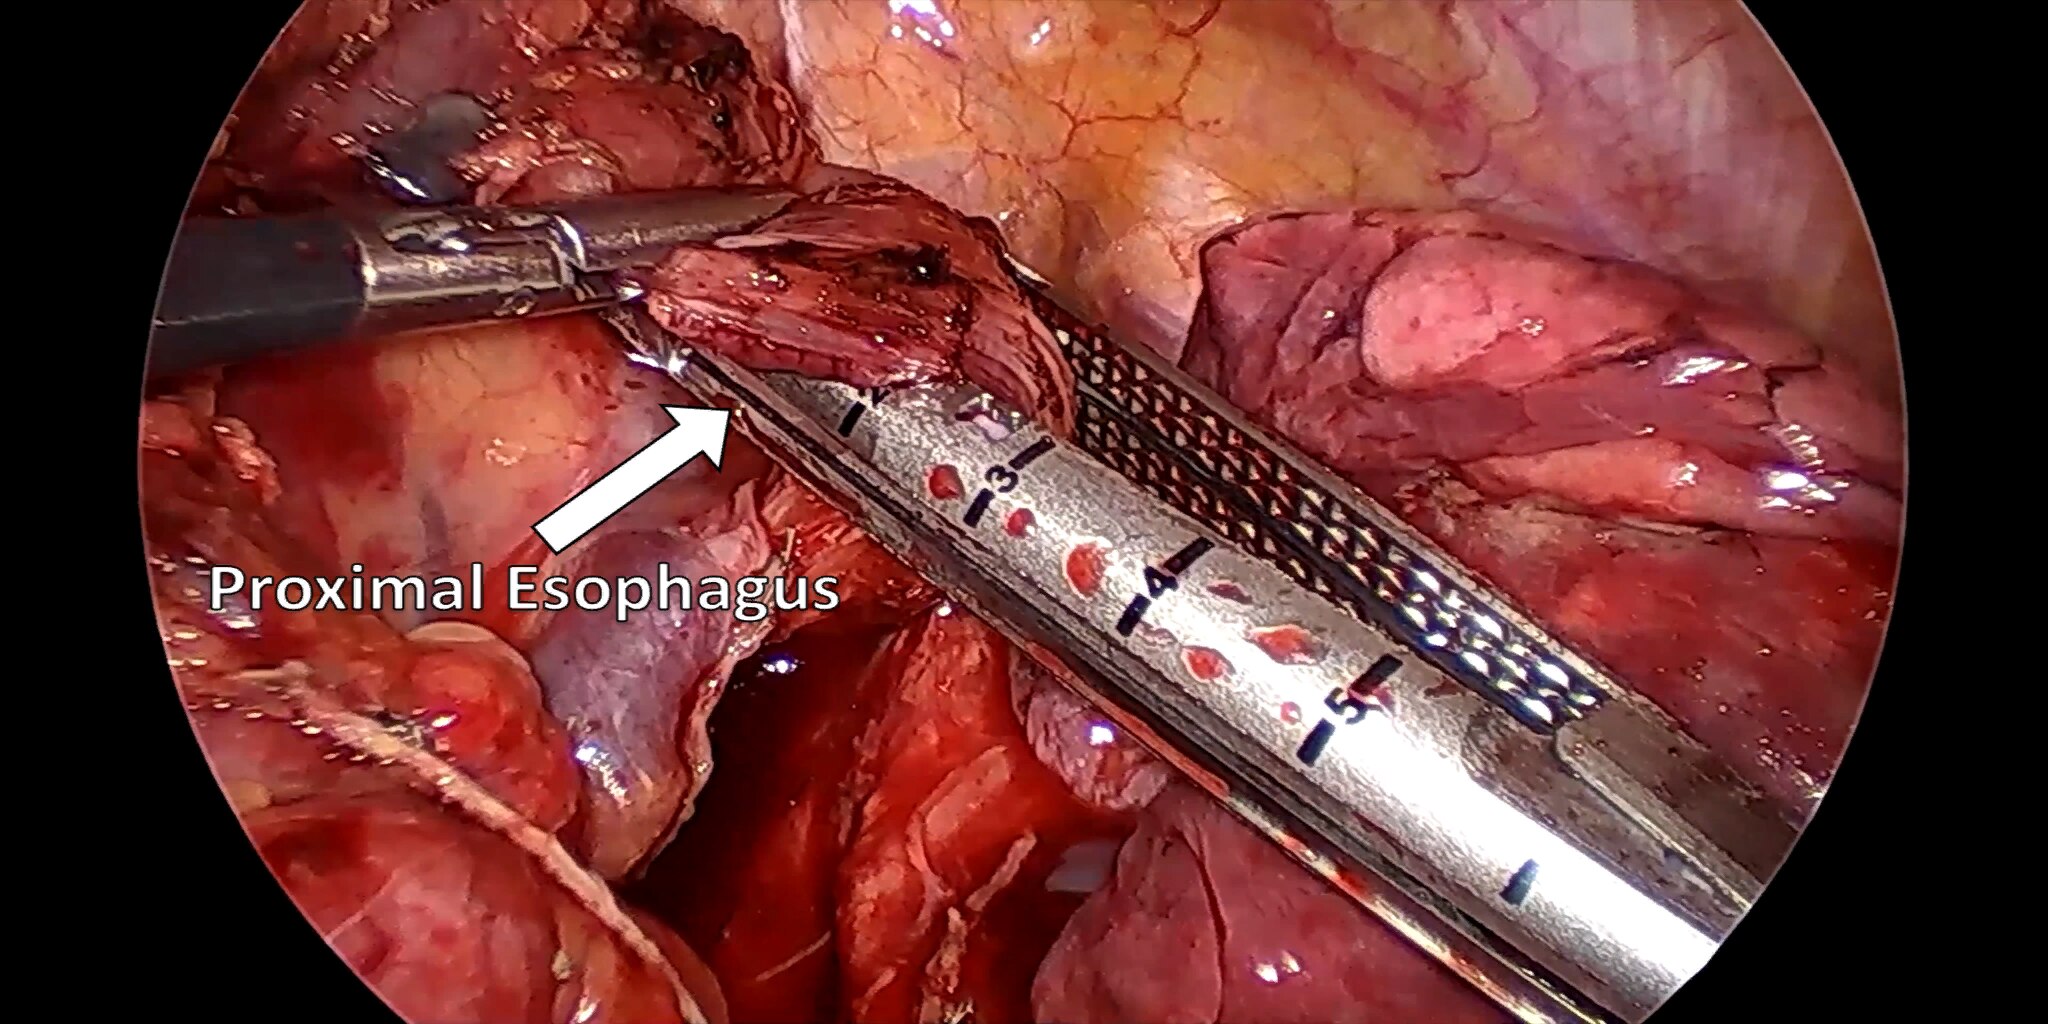
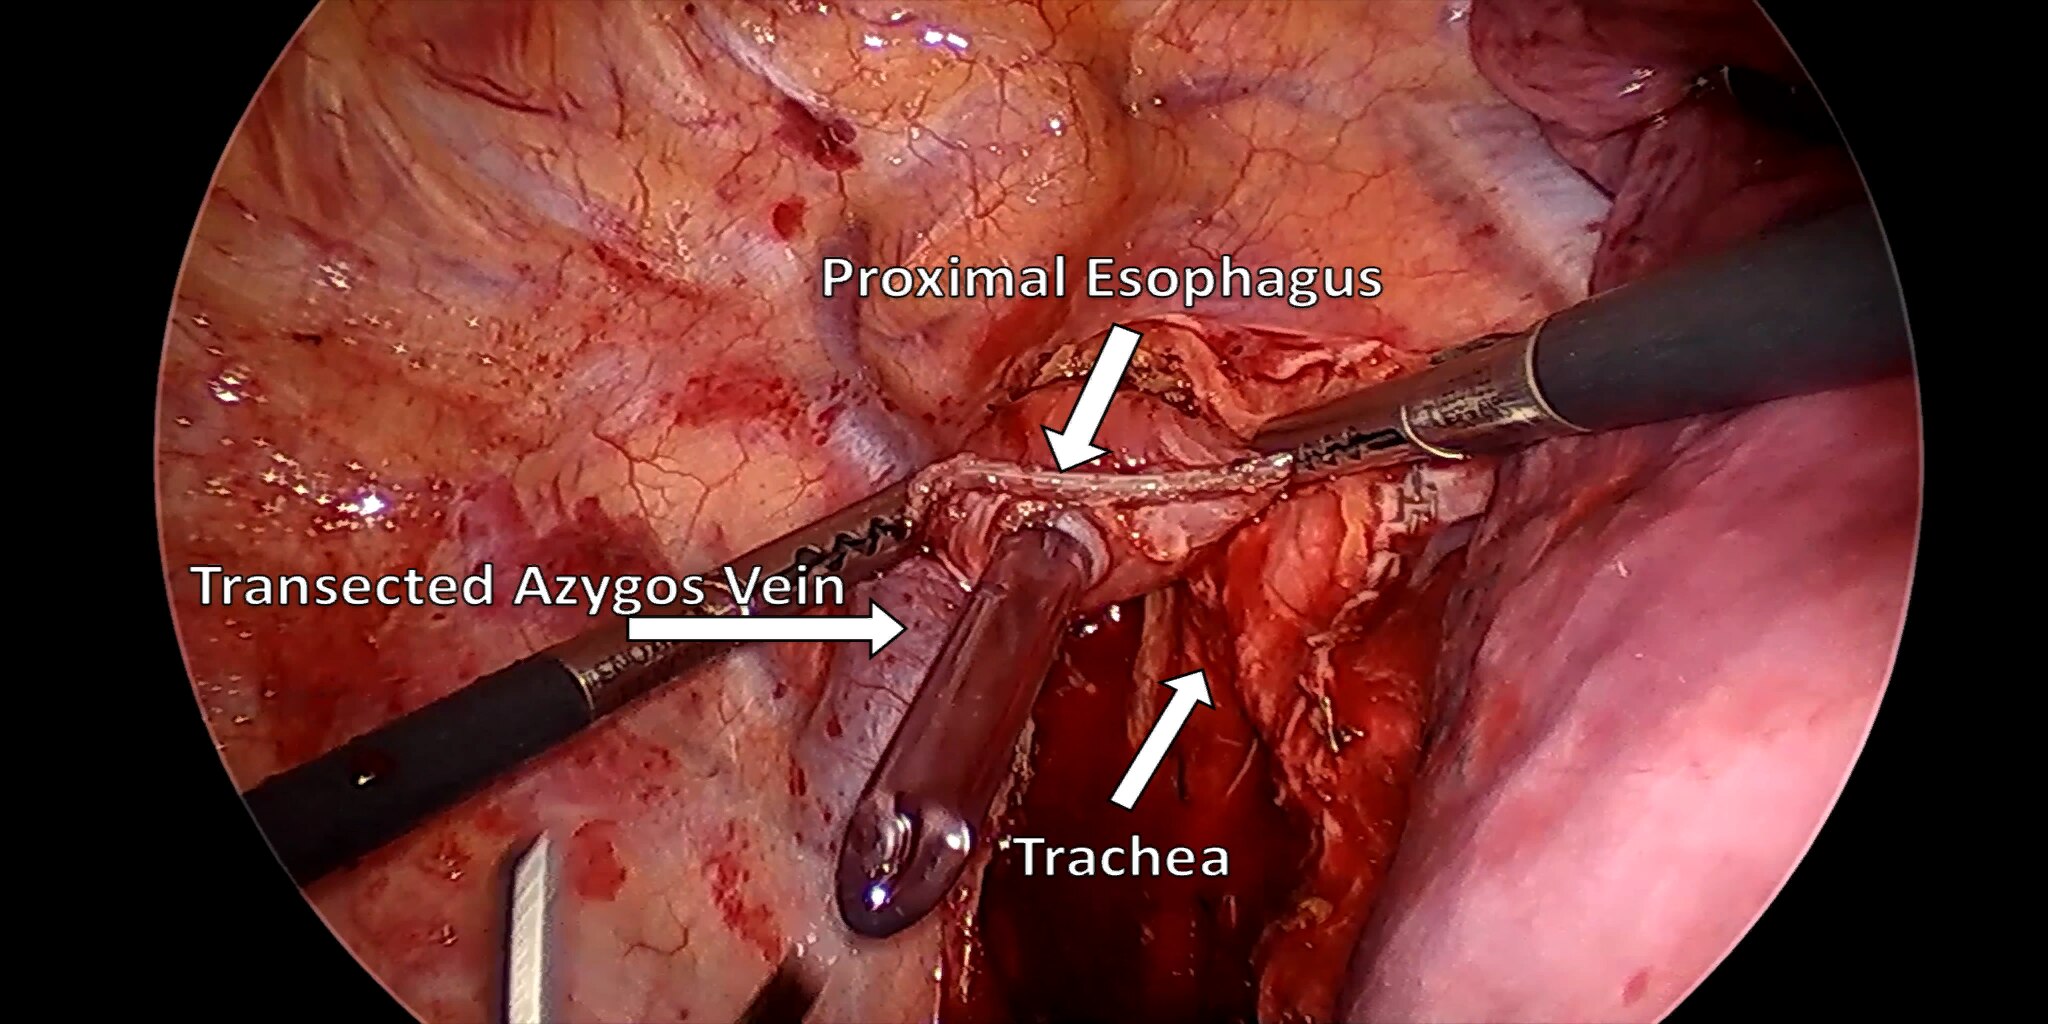
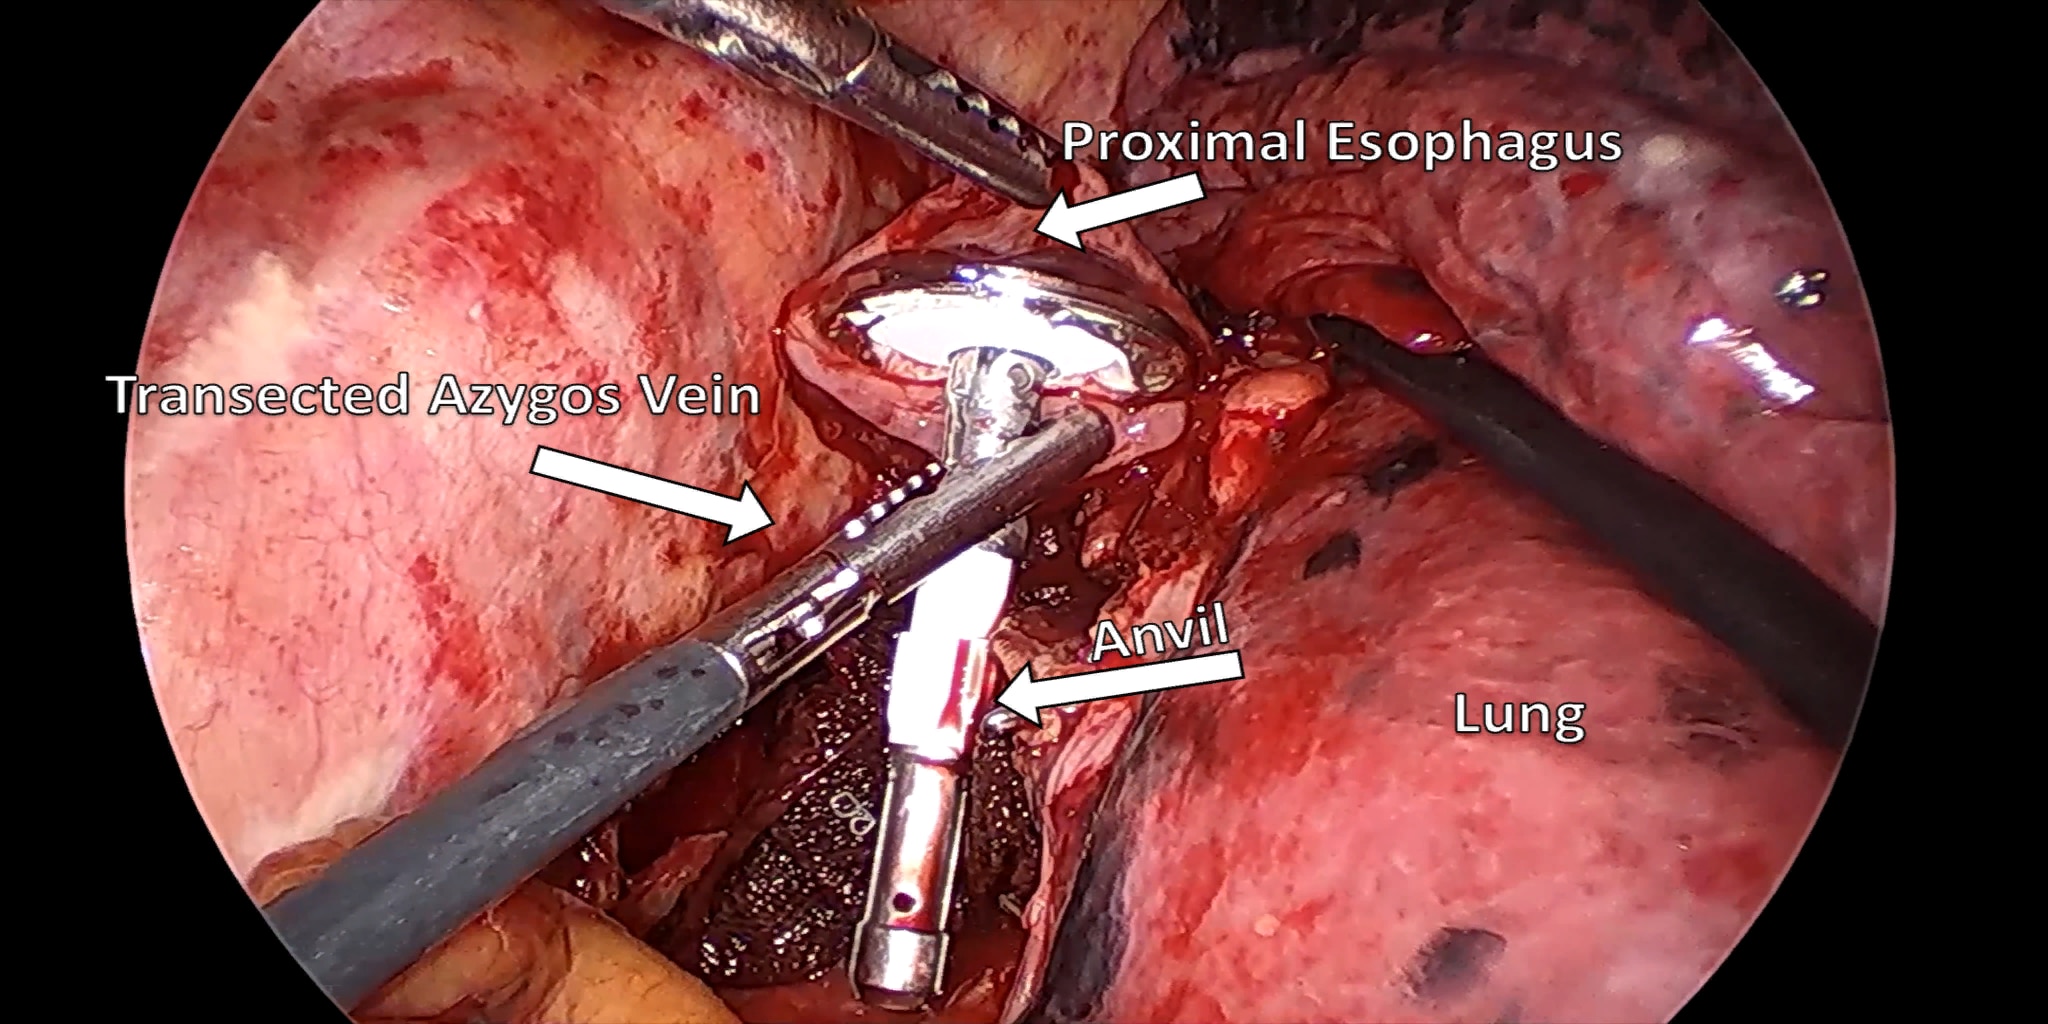
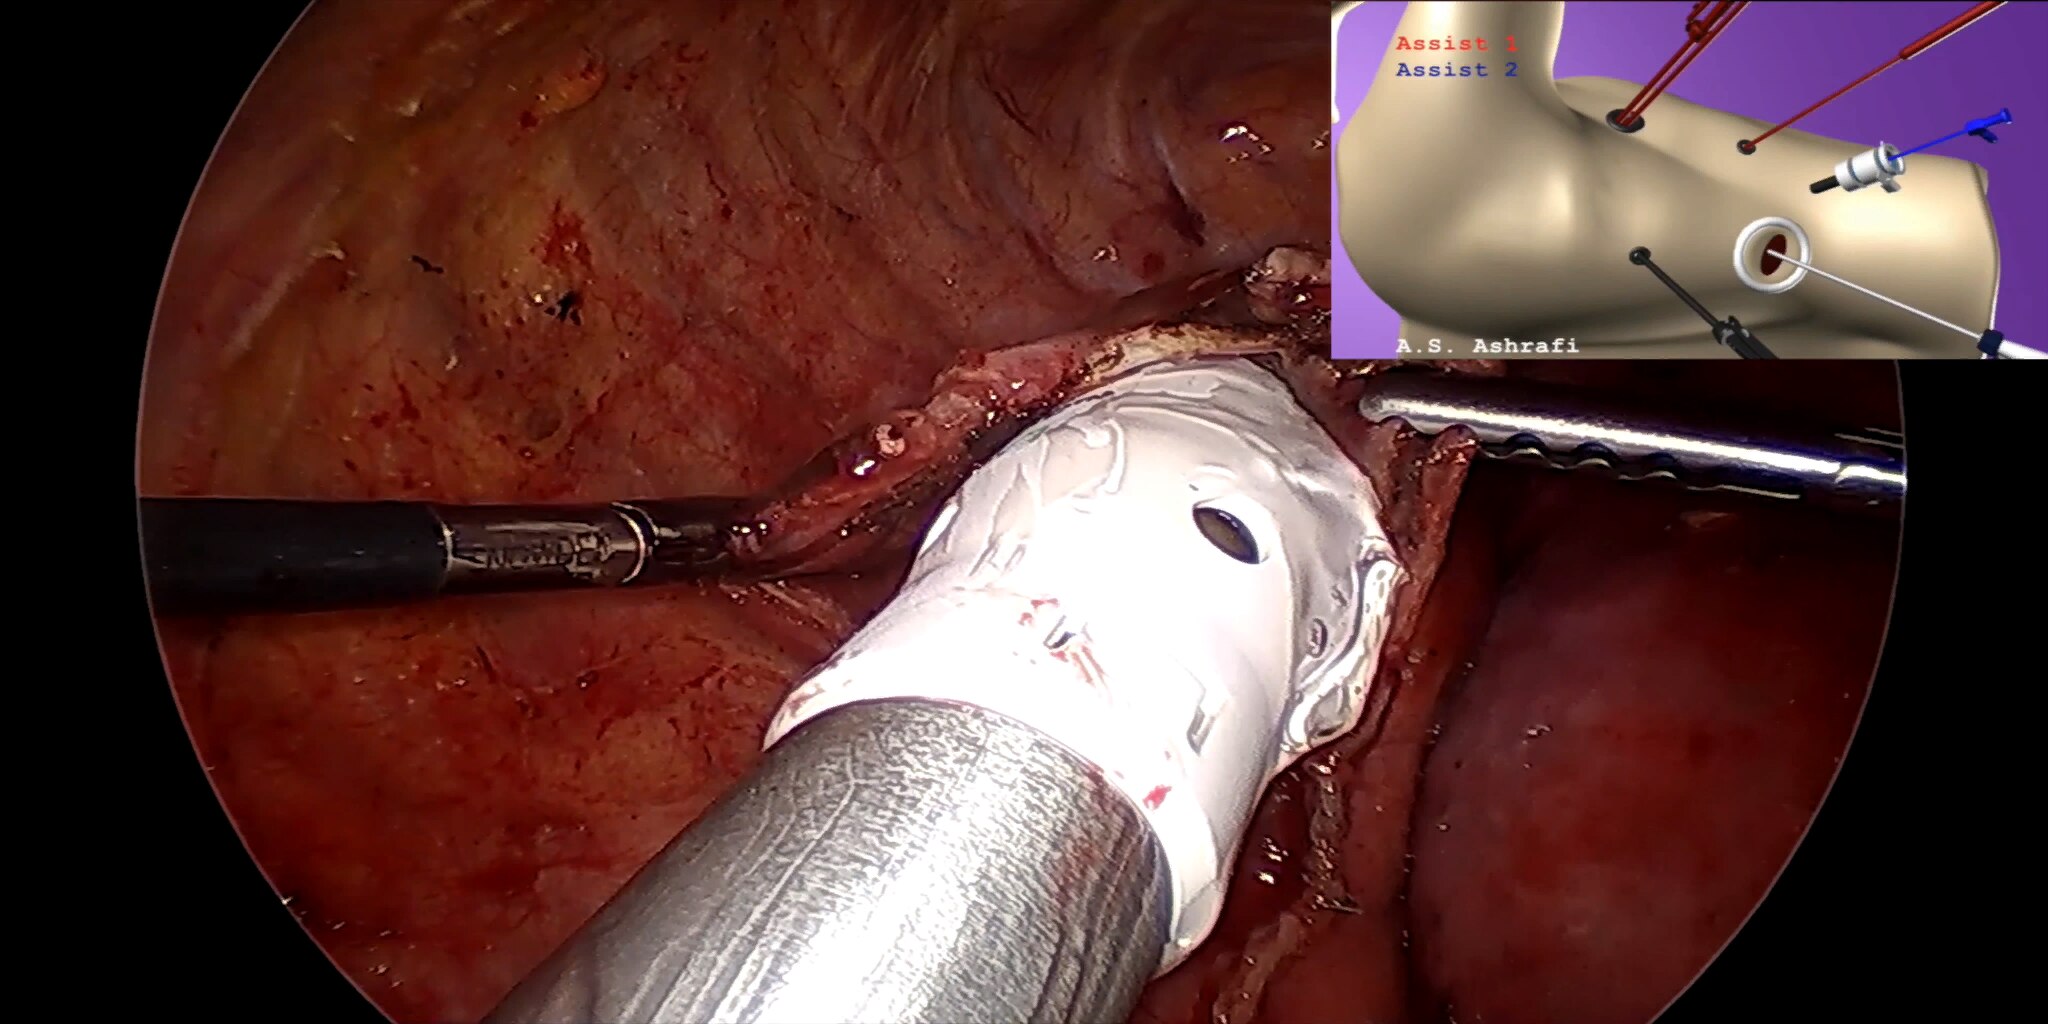
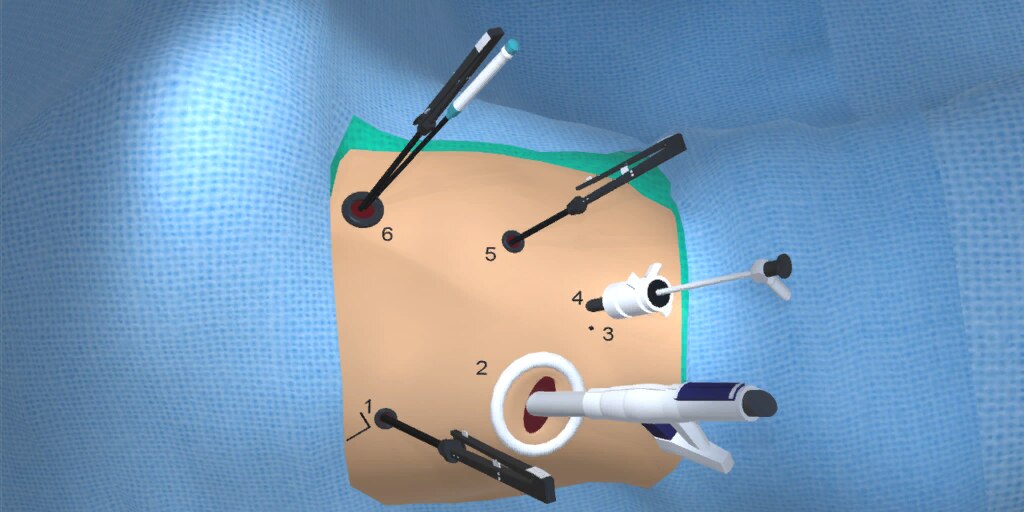
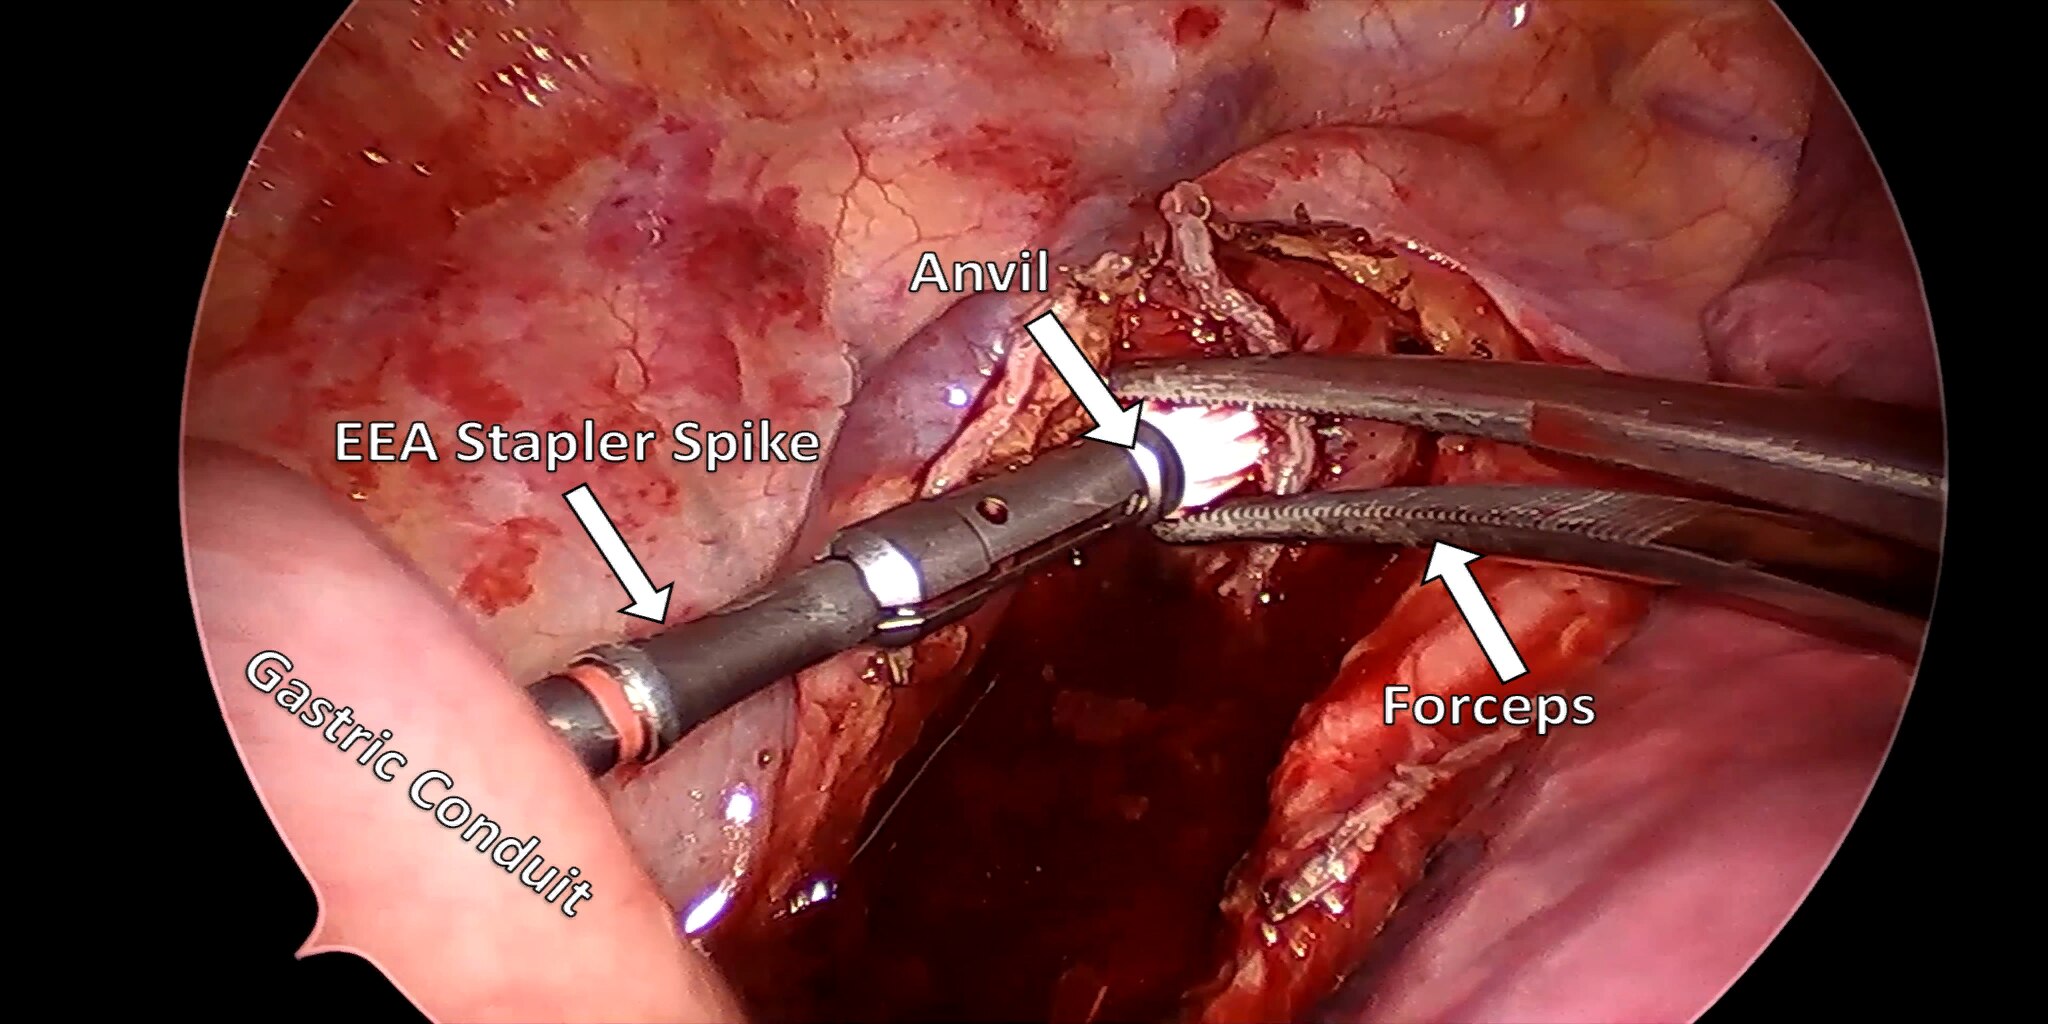
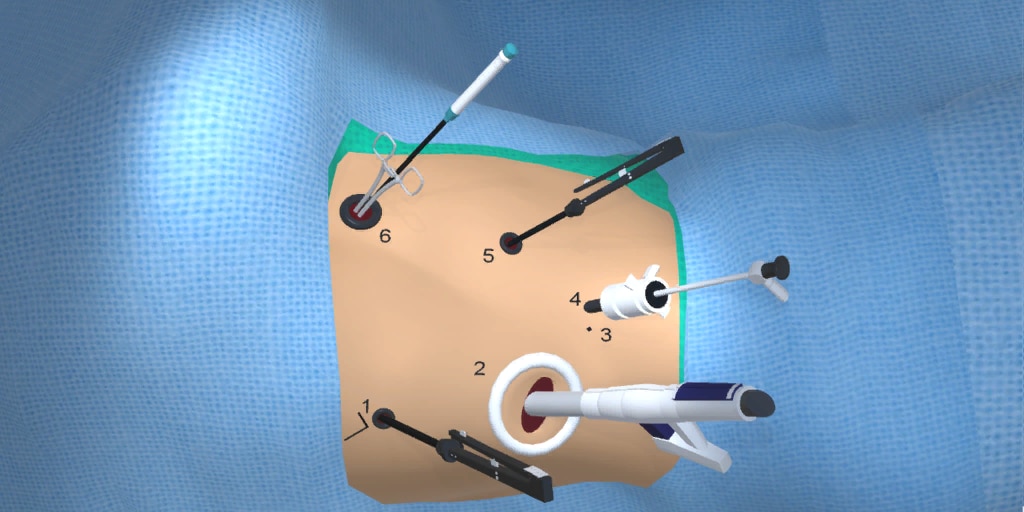
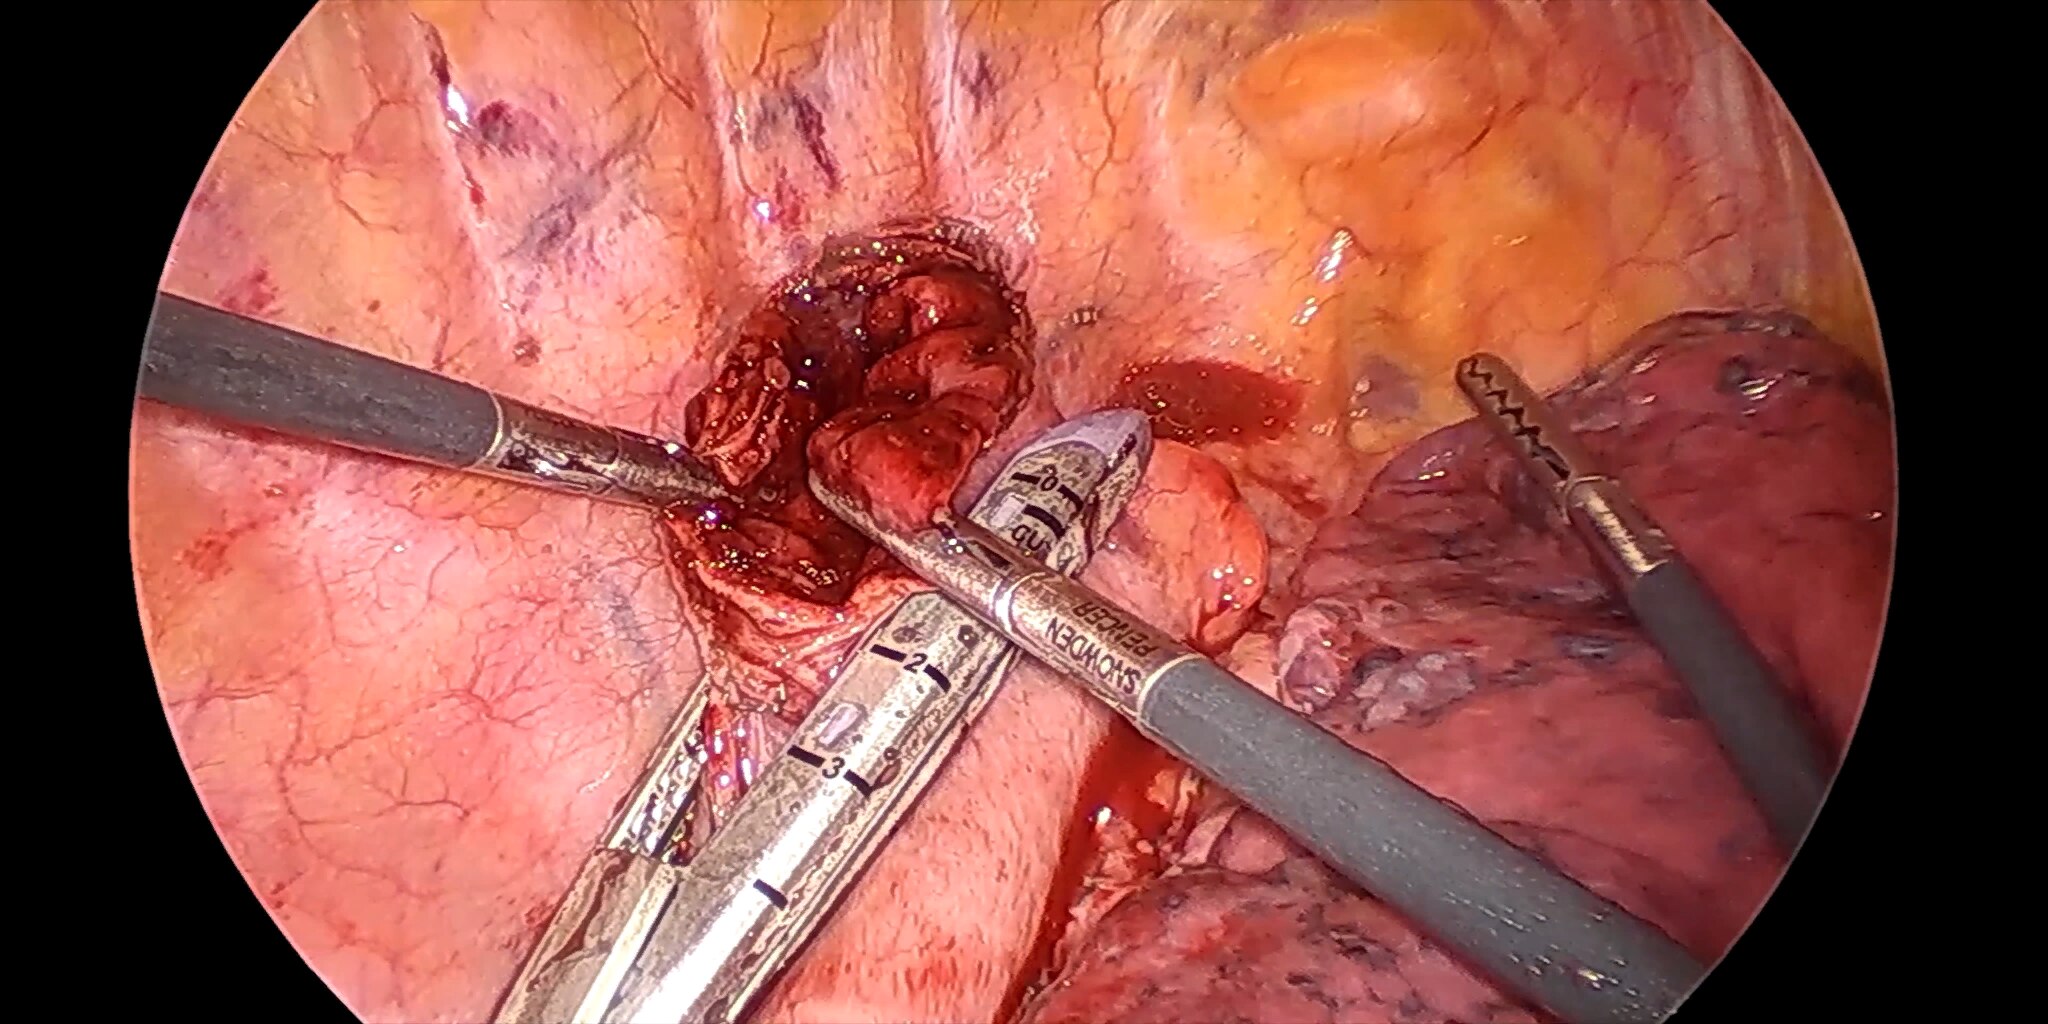
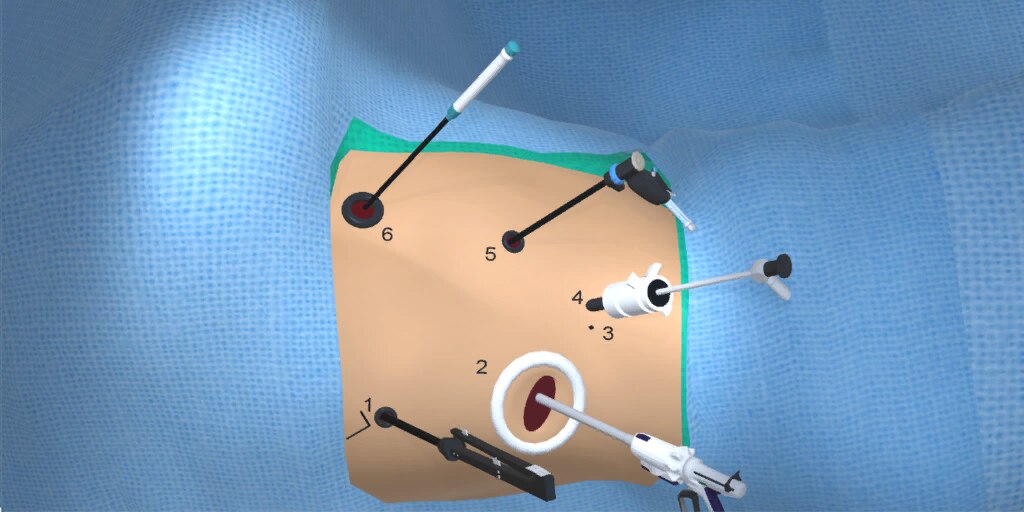
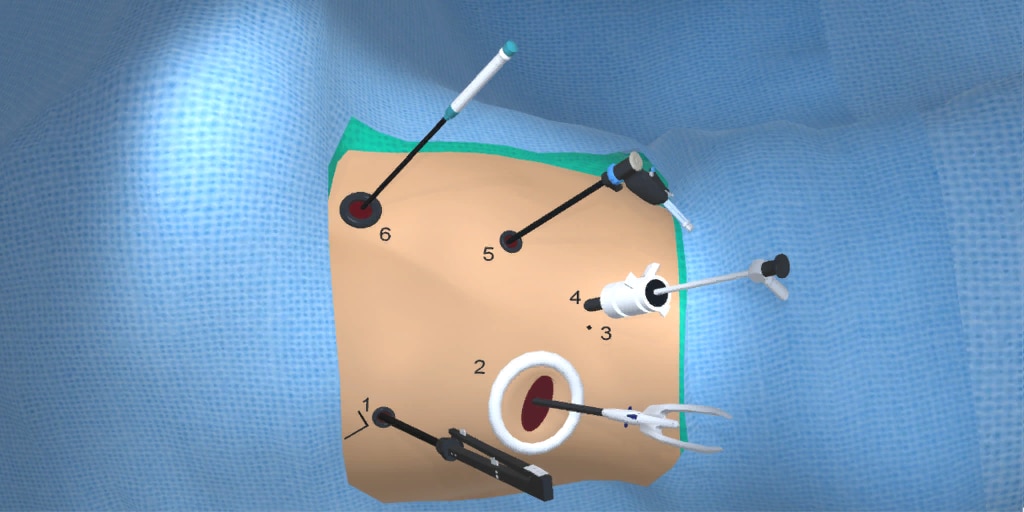
There are several minimally invasive techniques described for resecting the esophagus and the associated reconstruction: These include the transhiatal (laparoscopy and neck incision), the modified McKeown (Right VATS, laparoscopy, and neck incision), and the Ivor-Lewis (Laparoscopy and Right VATS with an intra-thoracic anastomosis). The prime objective of this paper is to provide the thoracic surgeon with appropriate pearls for mastering the minimally invasive Ivor-Lewis esophagectomy technique.

Ever since the report of the CROSS trial [9] esophagectomy as primary therapy for esophageal cancer has become less common, and trimodality therapy (chemoradiation followed by esophagectomy) has become the norm at most major centres around the world. The reported median overall survival was 49.4 months in the chemoradiotherapy-surgery group versus 24.0 months in the surgery group. Performing esophagectomy after chemoradiation does add additional complexity; however this is not a contra-indication and in fact, the significant majority of patients coming to esophagectomy for cancer nowadays receive induction chemoradiotherapy.

In an attempt to focus primarily on the technical aspects of minimally invasive Ivor-Lewis esophagectomy, the reader is encouraged to consult other sources for a discussion on preoperative preparation and work up of the patient prior to surgery, and for a discussion on the management of post-operative adverse outcomes. There will also be no discussion of outcomes of minimally invasive Ivor-Lewis esophagectomy.

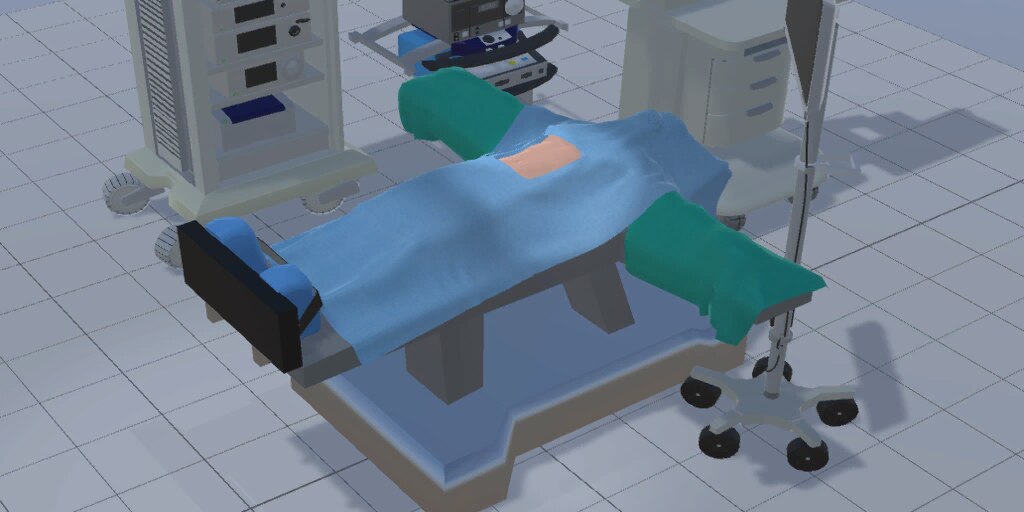
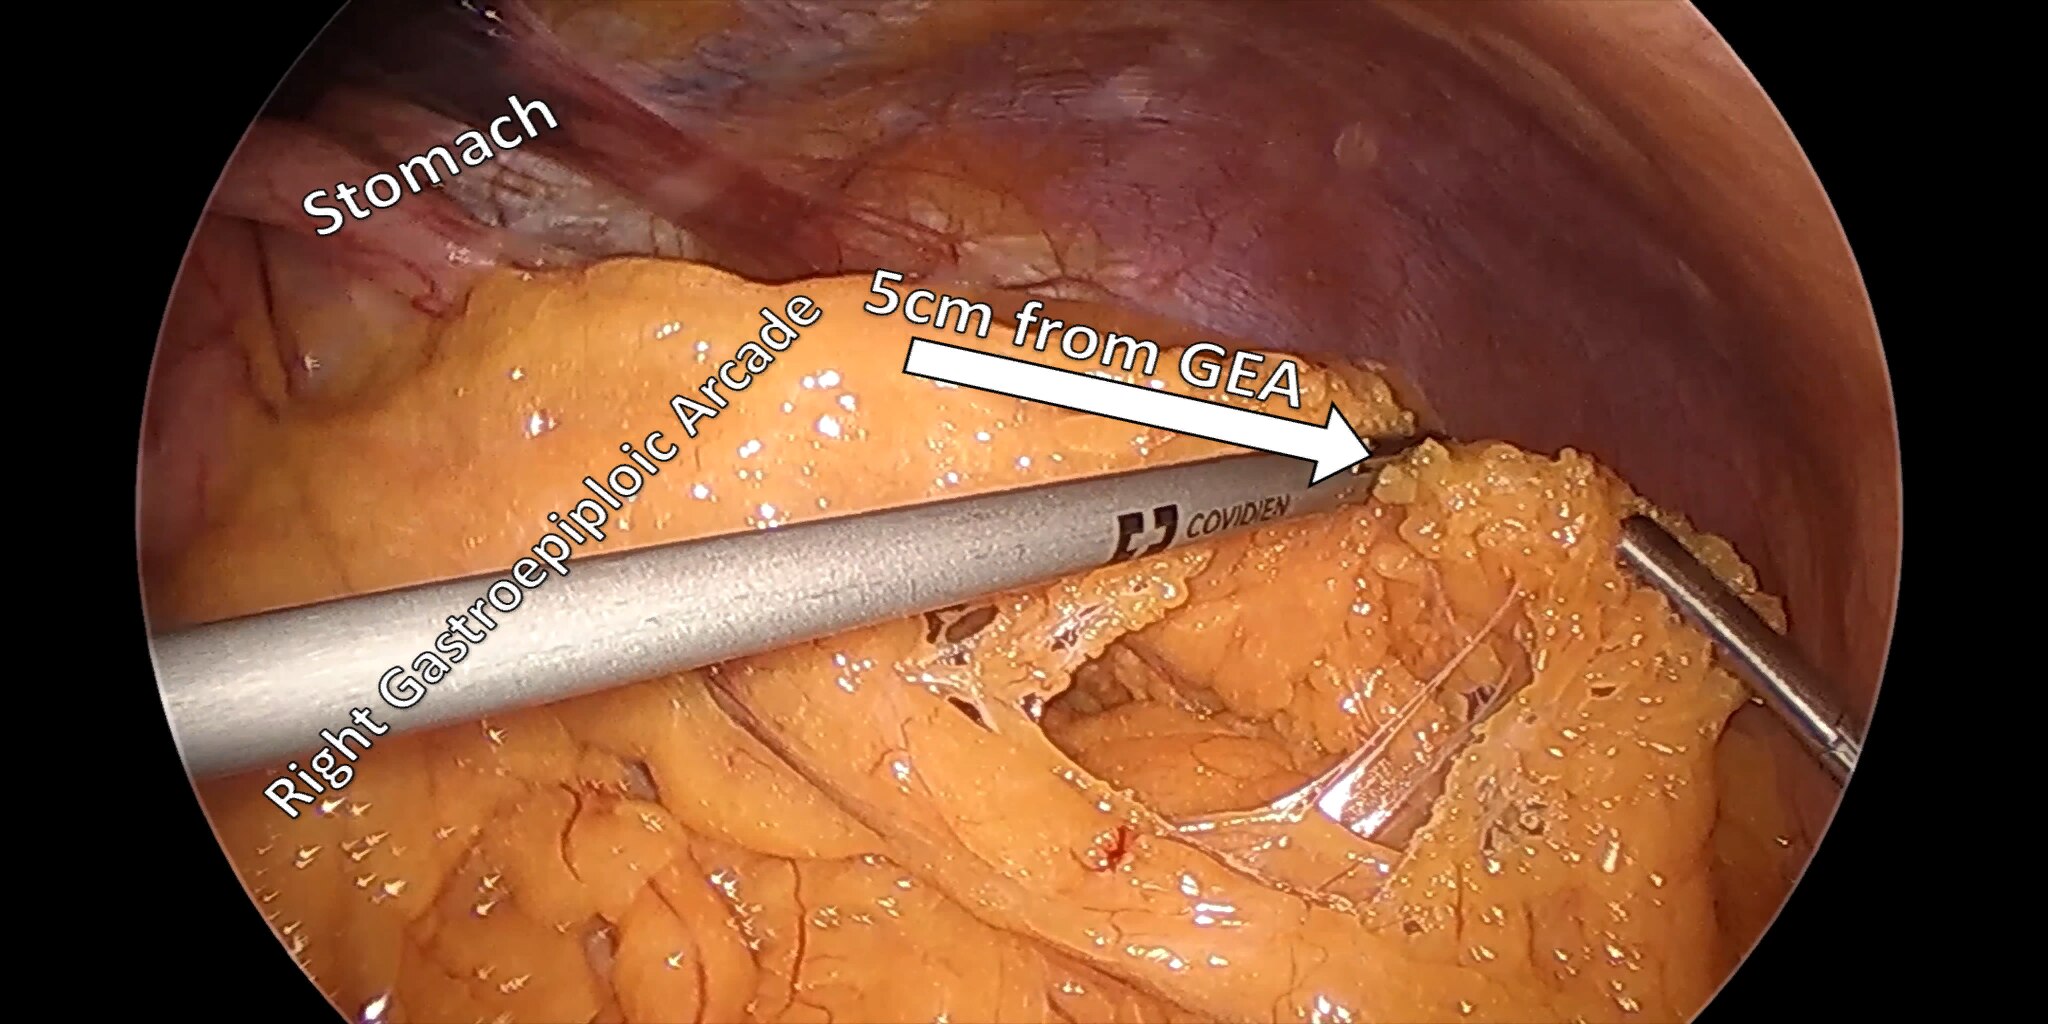
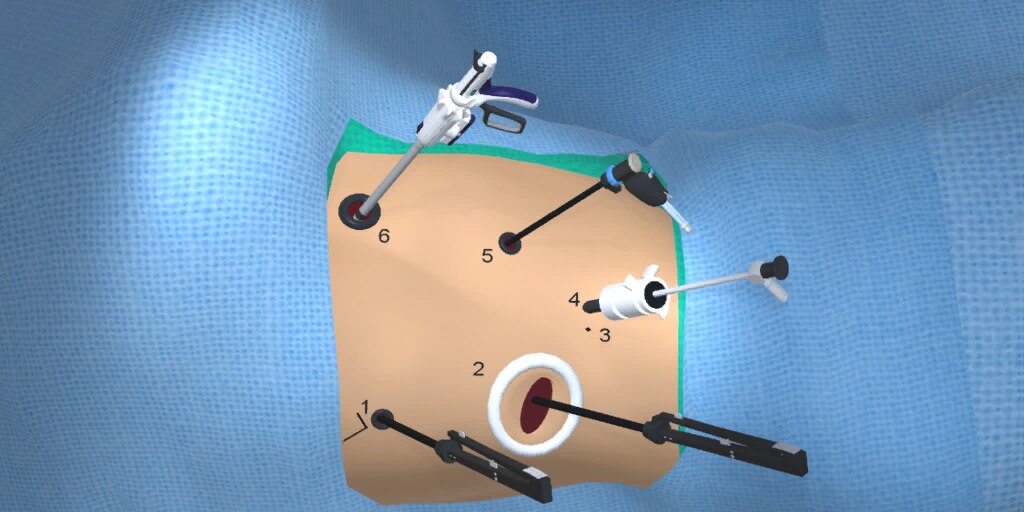
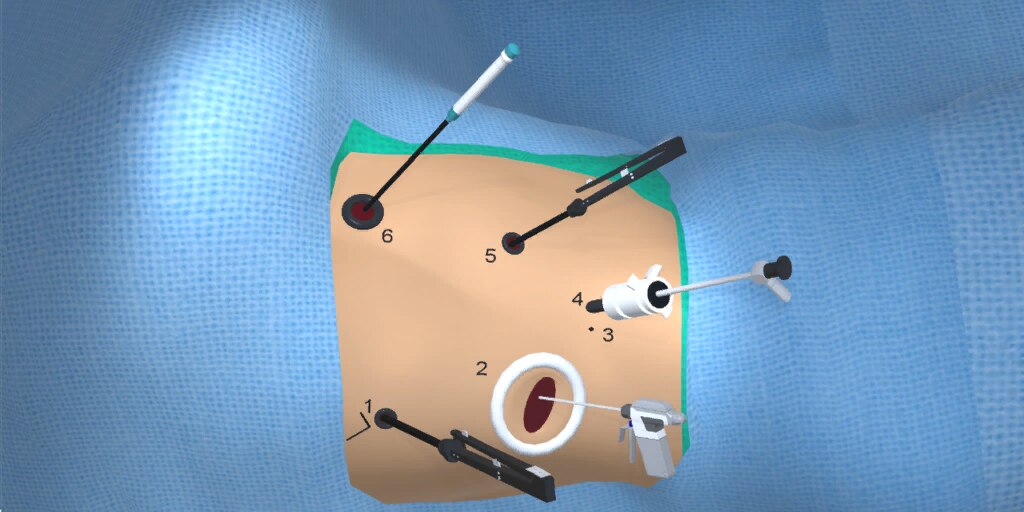
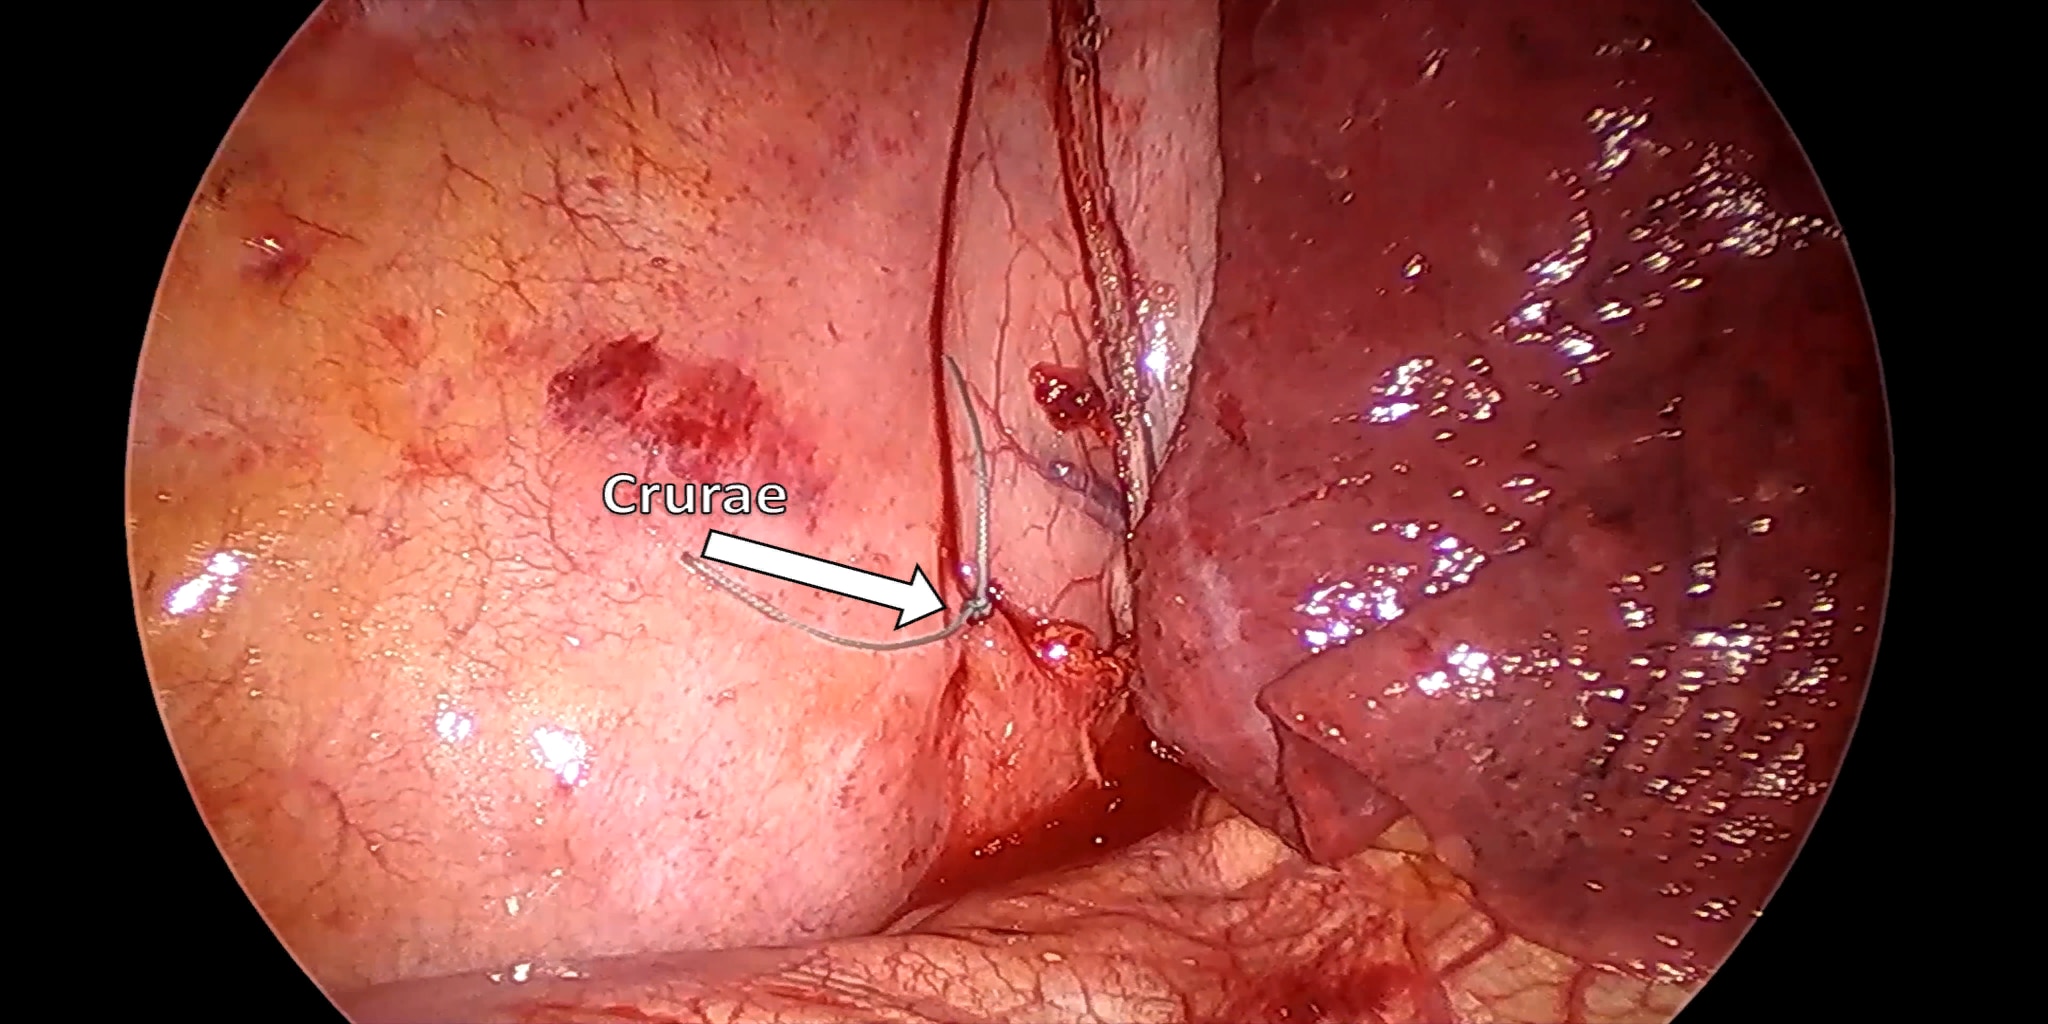
At our center, all patients undergo an esophagogastroduodenoscopy (EGD) to confirm the tumor’s location and the suitability of the stomach as a conduit for reconstruction. The EGD is typically performed a few days preoperatively (sometimes combined with laparoscopic staging, which is performed as an ambulatory procedure), or at the beginning of the operation. If the latter approach is taken, it is important to be mindful of the degree of endoscopic air insufflation, as the air in the small intestines can impair laparoscopic visualization. The operation is divided into two phases: Laparoscopic and Thoracoscopic.

Part I: Laparoscopic Phase

The Ivor-Lewis esophagectomy commences in the abdomen and finishes in the right thorax. The patient will usually have an arterial line, orogastric or nasogastric tube, double-lumen endotracheal tube, Foley catheter, two large-bore intravenous lines, and an oropharyngeal temperature probe. Epidural catheter and central venous lines are reserved for select patients deemed higher risk for conversion or requiring intense monitoring.

Figure 1 shows the patient positioning in the supine position, with both arms extended and a foot- board applied to prevent downward slippage of the patient when extreme reverse Trendelenburg position is implemented.

Figure 1
Figure 1

Figures 2a and 2b show the port positioning for the laparoscopic phase. We believe understanding of and appropriate execution of proper port positioning is one of the fundamental steps that will set the tone for the remainder of the operation. We therefore emphasize detail and attention to this aspect of the discussion.

Figure 2a
Figure 2a

We utilize 6 ports (Figure 2a, 2b) in the abdomen, using the following configuration:

Ports 1, 3, 4, and 5 are 5mm, while ports 2 and 6 are 12mm. We use a “Rule of 3‘s” when placing our ports: We start off by dividing the line between the umbilicus and the sub-xiphoid area into 3 parts (Please see points A, B, C, and D, Figures 2a, 2b). We place ports 1, 2, 3, and 4 in a straight line, perpendicular to point C. The distance between each subsequent two ports (1 and 2, 2 and 3, and 3 and 4) is roughly the same. This line of ports (depicted by the dotted line, Figure 2b) may be moved laterally for thinner or taller patients.

Figure 2b
Figure 2b

It is strongly recommended to use the open Hassan technique for accessing the peritoneal cavity, and this is done through port number 2. If the patient has not had previous abdominal surgery, we start with port number 2 (12mm Hassan), inserting the 5mm, 30-degree scope (through port 2) and then placing ports 3 and 4 under direct visualization. Note that port 4 may be positioned laterally depending on the patient’s habitus. We then move the scope to port number 4, inserting the sub- xiphoid liver retractor (port 5), and finally inserting port number 1 before moving the scope back to port number 3. Similar to port 4, port 1 may also be positioned laterally depending on the patient’s habitus.

If the patient has had previous abdominal surgery, it is typically best to enter the abdomen in the quadrant opposite the site of the previous operation. This makes it least likely to encounter the adhesions as the peritoneal cavity is entered. Please note that port number 6 (also 12mm) is primarily used to facilitate insertion of the laparoscopic feeding Jejunostomy (J) tube, as well as the conduit tubularization. Therefore, this port can either be inserted at the same time as port number 1, or alternatively, when it is time to perform the J tube insertion and the conduit tubularization part of the operation.

As mentioned above, it is preferred to have a tube in the stomach at the beginning of the operation and this gastric decompression not only improves visualization, but also facilitates easier manipulation of the stomach and lowers the risk of trauma to the stomach. Paying utmost attention to the gastric conduit is crucial for reducing ischemia and subsequent anastomotic leak. Once all the ports are established, the patient is placed in a steep reverse-trendelenburg position, and the room lights are dimmed, to improve visualization. It is best to commence by performing a general diagnostic laparoscopy and rule out any obvious contra-indications to proceeding with esophagectomy. Assess the liver and the omentum, as well as the peritoneal lining. You then proceed with the abdominal phase of this operation which consists of: a) exploration of the gastroesophageal junction (GEJ), b) preparation of the gastric conduit, c) performing a pyloromyotomy, d) feeding J tube, e) mobilization of the esophagus in the mediastinum, and finally f) preparation of the gastric conduit for delivery into the chest in the second phase of the operation.

I-a: Exploration of the Gastroesophageal Junction

Once metastatic disease is ruled out by laparoscopy, you turn your attention towards addressing resectability of the tumor. The assistant aligns the camera through port 3 and uses an atraumatic grasper through port 4 to retract the GEJ downwards and to the patient’s left (Figure 3). The surgeon uses an atraumatic grasper through port 1, and an energy device (SonicisionTM Cordless Ultrasonic Dissection Device from Medtronic, Dublin, Ireland) through port 2 (Figure 3).

Figure 3
Figure 3

The pars lucida is opened and the caudate lobe of the liver identified (Figure 4). The peritoneal line parallel to the medial aspect of the right crus is explored by incising it with the energy device. The right crus is grasped with the surgeon’s left hand (atraumatic grasper through port 1) and retracted to the patient’s right. The assistant grasps the GEJ fat pad, retracting it to the patient’s left. Retraction of the esophagus anteriorly and to the left facilitates retroesophageal exploration and assessment of the relationship of the esophagus and tumor with the aorta. It is best not to explore the hiatus too extensively at this point, because the pleural integrity needs to be preserved until later in the operation; loss of pleural integrity creates risk for the development of a tension pneumothorax. The exploration then extends towards the fundus, allowing for the relationship between the stomach and the spleen as well as the crurae. Crural invasion is usually manageable laparoscopically with an en bloc resection. Once the fundus is fully assessed, we then turn our attention to the next phase of the operation as follows.

Figure 4a
Figure 4a
Figure 4b
Figure 4b

I-b: Preparation of Gastric Conduit

The assistant will grasp, via port 4, the gastrocolic omentum at approximately midpoint and retract it inferiorly. The surgeon retracts the stomach superiorly by grasping it at midbody via port 1 (Figure 5). It is best to minimize the repositioning of the surgeon’s grasper, in order to reduce the risk of trauma and subsequent ischemia.

Figure 5a
Figure 5a
Figure 5b
Figure 5b

The energy device is then used through port 2 and the avascular plane between the two graspers is incised. The lesser sac should be entered immediately with this maneuver, exposing the posterior wall of the stomach. We proceed by dissecting first toward the proximal stomach, and then distally. Once the lesser sac is entered, it is best that the assistant retracts the omemtum to the left of the patient. The short gastric vessels are then divided up to the left crus. Hemoclips may be applied along the splenic side of the short gastric vessels.

We then take down all retrogastric attachments, both from the left and the right side of the stomach. We rotate the stomach to the right when working from the left. We dissect free and sweep forward all the tissues along the anterior/cephalad border of the pancreas, in order to maximize our lymphadenectomy. The stomach is then retracted superiorly and the left gastric artery is divided using an endoscopic stapling device with a vascular cartridge advanced via port 2 (Figure 6).

Figure 6a
Figure 6a
Figure 6a
Figure 6a

The mobilization of the pyloro-antral area must be meticulous. During this part of the procedure, we periodically grasp the antrum, near the pylorus and carefully lift it towards the diaphragmatic hiatus. Once sufficiently mobilized, the pylorus should easily be elevated to the base of the right crus in a tension-free manner. If this cannot be accomplished, or there is tension during this maneuver, further mobilization is needed. Prior to tubularizing the stomach, we insert the port number 6 and ensure that the stomach is completely free. A grasper through port 6 is then placed on the antral area and used to pull on the stomach inferiorly, while a second grasper via port number 4 is applied on the tip of the fundus to gently stretch it towards the spleen (Figure 7). This places the stomach on slight stretch, and facilitates a straight staple line application, which should be parallel to the gastro-epiploic arcade.

A gastric tube is then created by dividing the stomach at the lesser curve using a 4.8mm stapler, preserving the right gastric vessels (Figure 7). This tube is created to be 5–6cm in diameter, in respect of the findings of Luketich and colleagues [10] who experienced a significant increase in gastric tip necrosis and anastomotic leaks when a narrower (3-4cm) gastric tube is created. We have found the following two maneuvers valuable for starting the staple line and for effective creation of the gastric conduit: (i) Clearing all of the lesser omentum down to the gastric serosa at the proposed starting point (and thus securely dividing the right-left gastric vascular arcade at this point with clips, vascular stapler or energy device); and (ii) Making the first staple firing perpendicular to the long axis of the stomach, such that the necessary conduit diameter is maintained. All subsequent firings are then made with the stapler parallel to the greater curvature of the stomach.

Figure 7a
Figure 7a
Figure 7b
Figure 7b

I-c: Pyloromyotomy

Pyloromyotomy is created by first applying a retracting suture on the superior aspect of the pylorus (Figure 8). This is done through port 2, while the assistant is retracting the stomach via port 4. The surgeon then uses a hook cautery to score the pyloromyotomy line, followed by cutting the muscle of the pylorus with endoscopic scissors. Care must be taken not to cut too much at a time. Also, significant care is required on the duodenal side, where it is much easier to breach the mucosa, as the mucosa is fixed to the submucosa.

Figure 8a
Figure 8a
Figure 8b
Figure 8b

I-d: Feeding Jejunostomy Tube

A feeding jejunostomy is then placed using a needle catheter kit (Cook Medical, Bloomington, Indiana) (Figure 9a/9b). A limb of jejunum is first tacked to the anterior abdominal wall in the left lower quadrant using an endoscopic suture. An additional 10mm port is placed in the right lower quadrant to facilitate this step. The needle and guide-wire are then passed into the jejunum under laparoscopic vision. Proper positioning of the catheter is confirmed by observing distension of the jejunum as air is insufflated into the needle catheter.

Figure 9a
Figure 9a
Figure 9b
Figure 9b

The jejunum is then completely tacked to the abdominal wall using several additional sutures. (Figure 9c/9d). The tube is then sutured to the skin.

Figure 9c
Figure 9c
Figure 9d
Figure 9d

I-e: Mobilization of the Esophagus in the Mediastinum

The esophagus is then mobilized as high up in the mediastinum as possible, in order to minimize the thoracoscopic mobilization in the right hemithorax (Figure 10). We believe the angles to mobilize the distal esophagus are ergonomically better suited to be approached via the abdomen than the chest.

Figure 10a
Figure 10a
Figure 10b
Figure 10b

I-f: Preparation of the Gastric Conduit Delivery into the Chest

The most superior portion of the gastric tube is then attached to the resection specimen using two heavy sutures, using the endoscopic sutures. These stitches maintain correct orientation of the stomach as it is delivered into the right chest.

We typically leave the Penrose drain around the esophagus during laparoscopic mobilization and push this drain as high as possible (above the level of the hiatus) at the conclusion of laparoscopy (Figure 11). This allows quick identification of correct dissection plane during thoracoscopy and further mobilization of the esophagus in the chest. We then remove the liver retractor and expel the CO2 from the peritoneal cavity and close the ports.

Figure 11a
Figure 11a
Figure 11b
Figure 11b

Part II: Thoracoscopic Phase

We then proceed with the right thoracoscopic phase of this operation which consists of: a) thoracoscopic mobilization of the esophagus, b) division of the azygos vein, c) delivery of the gastric conduit into the chest, and d) performing the intrathoracic anastomosis.

II-a: Right Thoracoscopic Mobilization of the Esophagus

The patient is turned to the left lateral decubitus position for thoracoscopy. The surgeon stands to the back of the patient and the assistants to the front. Six thoracoscopic ports are used (Figure 12). A 10mm camera port is placed in the 7th or 8th intercostal space, just anterior to the midaxillary line (Port 4). A 10mm port is placed at the 8th or 9th intercostal space, posterior to the posterior axillary line, for the ultrasonic coagulating shears (Port 2). A 10mm port is placed in the anterior axillary line at the 4th intercostal space and is used to insert a fan-shaped retractor to retract the lung anteriorly and expose the esophagus (Port 6). A 5mm port is introduced anteriorly just posterior to the midclavicular line, around 8th or 9th interspace (Port 5). This port is mainly used for a thoracoscopic suction device. The last 5mm port is placed just posterior to the tip of the scapula and is used for retraction by the surgeon (Port 1). A key initial step in exposure is to place a retracting suture through the central tendon of the diaphragm which is brought out through the anterior chest wall via a 1mm incision (Port 3). This suture retracts the diaphragm inferiorly and allows excellent visualization of the gastroesophageal junction.

Figure 12
Figure 12

The inferior pulmonary ligament is then divided by the energy device through port 2, while the surgeon retracts the lung using a grasper through port 1. The camera is in port 4, the fan retractor is in port 6, and the suction device through port 5 is used to evacuate the smoke and keep the field dry (Figure 13).

Figure 13
Figure 13

II-b: Division of the Azygos Vein

The mediastinal pleura overlying the anterior aspect of the esophagus are divided to the level of the azygos vein. The azygos vein is then ligated using an endoscopic stapler through port 2, which gives the best angle for this step (Figure 14).

Figure 14a
Figure 14a
Figure 14b
Figure 14b

We are careful at this point to preserve the mediastinal pleura above the junction of the azygos vein and the superior vena cava. We believe this maintains the gastric conduit in a mediastinal location and may seal the plane between the stomach and the thoracic inlet.

We then proceed to circumferentially mobilize the esophagus up to 2cm above the carina, performing en-bloc removal of all periesophageal and subcarinal lymph nodes and fat into the specimen. We do not attempt to include the thoracic duct in the resected specimen. The anterior mobilization is done with the energy device, and entails freeing the esophagus and lymph nodes from the posterior aspect of the pericardium and membranous portion of the right bronchial tree. The posterior mobilization involves sequential application of clips before division of the tissue along the esophagus. This is essential since these posterior attachments contain the segmental blood supply (from the aorta) and lymphatics. Failure to meticulously secure this tissue with clips increases the risk of bleeding or chylothorax. The Penrose drain placed around the esophagus during the abdominal phase, greatly aids in this mobilization, by allowing anterior and posterior retraction of the esophagus as necessary. Extreme care is required while using the energy device while freeing the esophagus from the membranous portion of the left main bronchus, to avoid bronchial injury during this maneuver.

The thoracic esophagus is thus mobilized from the diaphragm to a point midway between the carina and thoracic inlet. The dissection plane is kept on the adventitial surface of the esophagus at the superior extent of the dissection, to avoid injury to either the airway or the recurrent laryngeal nerves.

II-c: Delivery of the Gastric Conduit into the Chest

After the esophagus is completely mobilized, the lower end of the specimen is grasped with atraumatic forceps via port 2 allowing delivery of the gastric conduit into the chest (Figure 15). At this point, we stretch the conduit and push it towards the thoracic inlet, in order to make sure there will be adequate length for a tension-free anastomosis.

Figure 15a
Figure 15a
Figure 15b
Figure 15b

Port 2 is enlarged into a 4-6cm incision and a wound protector is then placed. The sutures holding the conduit to the specimen are cut (thoracoscopic scissors through port 6) and the esophagus is transected proximally. This is done using the endoscopic linear stapling device through port 6 (Figure 16). The specimen is then retrieved through port 2 and the margins are checked grossly. A frozen section examination should be requested at the discretion of the surgeon.

Figure 16a
Figure 16a
Figure 16b
Figure 16b

II-d: Performing the Intrathoracic Anastomosis

Technique of Esophago-Gastric Anastomosis. The anastomosis is created using the end-to-end EEA™ circular stapling instrument (DST SeriesTM EEA™ Stapler from Medtronic, Dublin, Ireland). Two approached methods are described here.

Method 1.

The assistant advances an orogastric tube attached to a trans-oral anvil, while the surgeon uses an energy device to make a small incision, posterior to the esophageal staple line, in order for the tube to be grasped and pulled through. (Figure 17a). Once the tip of the anvil is visualized, the sutures attaching it to the tube are divided, allowing the tube to be extracted and discarded.

Figure 17a
Figure 17a
Figure 17b
Figure 17b
Method 2.

The alternative approach is to place the anvil into the open end of the transected esophagus and hand-sew a purse string suture to close the esophagus around the shaft (Figure 17c). In this approach, it is essential that a transverse (circular) myotomy of the esophagus be performed with the endoscopic scissors, to create a minimum 1cm cuff of mucosa beyond the cut edge of the muscle. This maneuver ensures that the esophageal mucosa is securely closed around the shaft of the anvil. Often, a second smaller purse string suture is necessary to secure any redundant folds of mucosa.

Figure 17c
Figure 17c

The surgeon then uses an energy device to incise the gastric conduit, parallel to the staple line that has created the tubularization, for a length of about 4-5cm, in order to allow the size 25mm EEA™ Stapler to be placed through port 2 (Figure 18).

Figure 18a
Figure 18a
Figure 18b
Figure 18b

The stomach is held with graspers through port 1 (surgeon’s left hand) and port 6 (assistant), and the camera may be moved to port 5 to give a more anterior view during creation of the anastomosis. The spike of the EEA™ stapler is brought out of the stomach nearly 180 degrees opposite the lesser curve staple line, and just slightly posterior to the line of the divided short gastric vessels. We apply forceps onto the plastic portion of the anvil to stabilize it while “docking” it with the EEA™ stapler. As the stapler is closed (Figure 19), it is important to move the stapler towards the thoracic inlet and away from the underlying airway. The stapler is fired and removed, following which the donuts are routinely checked for completeness. If the donuts are incomplete, we perform an endoscopy and inspect the anastomosis. We then perform an “air leak test” by insufflation of air and submerging the anastomosis under water. The anastomosis is re-enforced with sutures as directed by the above maneuvers.

Figure 19a
Figure 19a
Figure 19b
Figure 19b

The gastrotomy is then closed by using endoscopic staplers through port 2 and the stapling is done in a fashion to create a new staple line, parallel to the initial tubularization staple line (Figure 20). Routine Intraoperative esophagoscopy may be performed at this point for several reasons: (i) To inspect the appearance of the gastric mucosa at the anastomotic site; (ii) To verify the integrity and patency of the anastomosis, particularly while the lesser curve is being reconstituted; and (iii) To insufflate the stomach with air, along with warm water immersion of the anastomosis, to verify absence of any air leak.

Figure 20a
Figure 20a
Figure 20b
Figure 20b

A nasogastric tube is placed in mid-conduit and positioned with (or without) endoscopic guidance. At this point, using port 2, several sutures are applied: Three sutures between the gastric conduit and the crurae, and two to three to fixate the gastric conduit to the chest wall (Figure 21). These latter sutures not only prevent gastric tube torsion and movement, but also take away tension from the anastomosis. Any redundant omentum can now be used to “wrap”, or cover, the anastomotic site.

Figure 21a
Figure 21a
Figure 21b
Figure 21b

A single 28 French chest tube (through port 4), as well as a flat drain (through port 3), are placed (Figures 22a, 22b). A multi-level intercostal/paravertebral block is performed and the lung is expanded, drains are secured to the skin, and wounds are closed in layers.

Figure 22a
Figure 22a
Figure 22b
Figure 22b

Conclusions

Minimally invasive esophagectomy is a technically demanding operation. Most descriptive atlases have described the steps of this operation as it pertains to what actually happens during the operation. We have approached this description from a different angle and have shown not only port placement in the abdomen and chest, but also port utilization with different instruments as the operation progresses from the beginning to the end. We hope that this is useful for not only the thoracic surgical trainees, but also the practicing surgeons who hope to refine their conduct of this operation.

References

  1. Collard JM, Lengele B, Otte JB, Kestens PJ (1993) En bloc and standard esophagectomies by thoracoscopy. Ann Thorac Surg 56: 675–679
  2. DePaula AL, Hashiba K, Ferreira EA, de Paula RA, Grecco E (1995) Laparoscopic transhiatal esophagectomy with esophagogastroplasty. Surg Laparosc Endosc 5: 1–5
  3. Swanstrom LL, Hansen P (1997) Laparoscopic total esophagectomy. Arch Surg 132: 943-947
  4. Palazzo, F., Rosato, E. L., Chaudhary, A., Evans, I. R., Sendecki, J. A., Keith, S., & ... Berger, A. C. (2015). Southern surgical association article: Minimally Invasive Esophagectomy Provides Significant Survival Advantage Compared with Open or Hybrid Esophagectomy for Patients with Cancers of the Esophagus and Gastroesophageal Junction. Journal Of The American College Of Surgeons, 220672-679
  5. Fanyu, M., Yin, L., Haibo, M., Ming, Y., & Ruixiang, Z. (2014). Comparison of outcomes of open and minimally invasive esophagectomy in 183 patients with cancer. Journal Of Thoracic Disease, 6(9), 1218-1224
  6. Noble, F., Kelly, J. J., Bailey, I. S., Byrne, J. P., & Underwood, T. J. (2013). A prospective comparison of totally minimally invasive versus open Ivor Lewis esophagectomy. Diseases Of The Esophagus: Official Journal Of The International Society For Diseases Of The Esophagus / I.S.D.E, 26(3), 263-271
  7. Zingg U, McQuinn A, DiValentino D, et al. (2009) Minimally invasive versus open esophagectomy for patients with esophageal cancer. Ann Thorac Surg 87:911-9
  8. Verhage RJ, Hazebroek EJ, Boone J, et al. (2009) Minimally invasive surgery compared to open procedures in esophagectomy for cancer: a systematic review of the literature. Minerva Chir 64:135-46
  9. van Hagen P, Hulshof MC, van Lanschot JJ, et al. (2012) Preoperative Chemoradiotherapy for Esophageal or Junctional Cancer. N Engl Med 336; 2074-2084
  10. Luketich JD, Alvelo-Rivera M, Buenaventura PO, et al. (2003) Minimally Invasive Esophagectomy: Outcomes in 222 Patients. Ann Thorac Surg 238; 486-495